
Patent Attorney and Founder
No secrets here. This guide will truly show you how to write a patent application and submit it to the USPTO to attain thtraat all-important Patent Pending status everyone is so familiar with.
At Bold Patents, we take pride in educating our community of innovators, engineers, scientists, and entrepreneurs. We fully understand that innovation occurs at every level of sophistication, industry, and financial position. No way will we allow only the wealthy or privileged have the information necessary to protect and leverage their inventions under the law.
All of that goes with saying that by no means do I recommend that inventors file their own patent applications.
I feel that inventors are best served when they are allowed time and resources to work on their craft, innovate, and continue to solve today’s biggest problems, not getting mired in an area of law that is foreign to them.
Leave the work of figuring out how to submit a patent application to professionals so that you can get the job done in the most efficient manner.
That said – I am confident that by publishing this truly no-holds-barred presentation on how to write a patent application and how to file it with the USPTO, I will help to enlighten inventors reading this and help them better appreciate the process they are embarking on.
So, let’s start…
I’ve decided to frame this article around a Utility Patent Application. This is mainly due to the fact that utility patent applications are by far the most common way to protect an invention. Remember, utility patents protect the functionality, as opposed to the design aspects of the invention (that’s what Design Patent Applications are for).
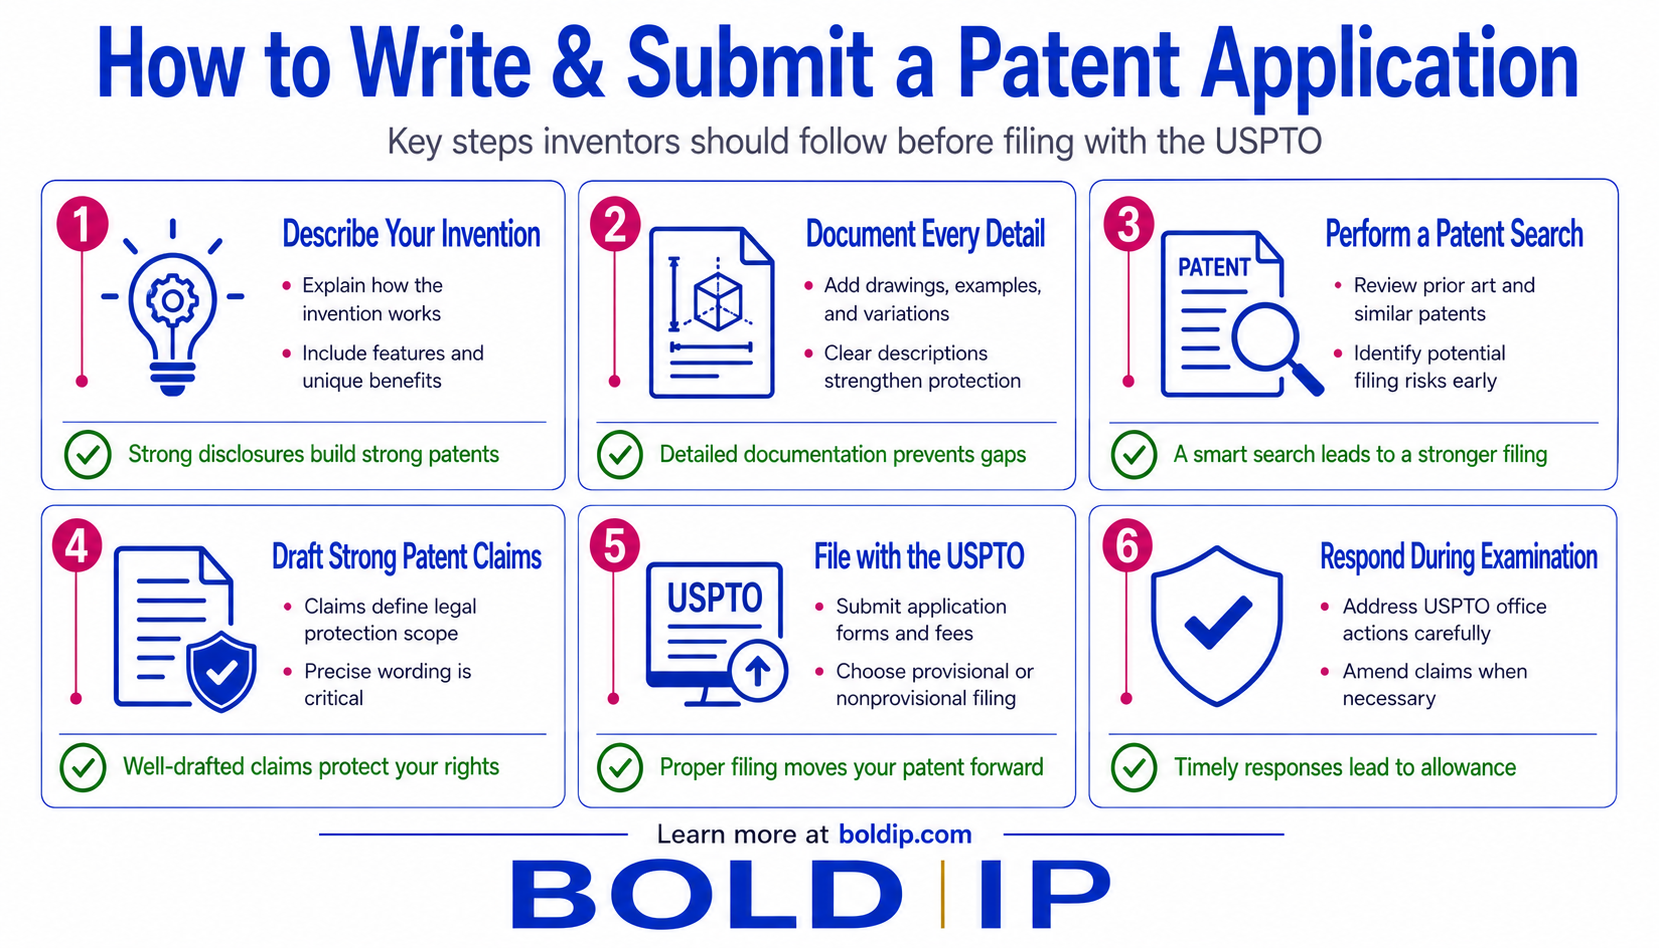
I’ve developed a 7-Step Patent Process™ that I’d like to introduce for the first time in this blog article. It will help set the stage for you as you learn how to write a patent application. The fundamentals of how to submit a patent application, what’s involved in said process, and how to eventually file a patent application will also be covered. As with many processes, they can be more complicated than you originally think they will be – so let’s just get it all out on the table then, eh?

With our inventors, we lay out a plan with them, so they can see the forest through the trees. This is vital for you to understand as well. It’s not as easy as “filing my patent” and receiving protection.
Each of the yellow “[DATE]” blocks is filled in with a real date so they can start to develop a business plan for how they will bring their product/service to market and integrate this plan with other activities they may have.
Speaking of “other activities”, I want to show you what I call the 20-Step Innovation Lifecycle™. These are activities that have shown up again and again as we work with inventors of all technical backgrounds as they start their companies and grow. The colors correlate from the 7-Step Patent Process™ shown above.

These 20 activities are the “everything else” that’s going on with an entrepreneur as they start their journey toward developing, marketing, selling, and being successful with their innovative product/service.
Again, I’m not showing this to overwhelm you, but instead just to help you appreciate the magnitude of this task of starting a company, developing a new product/service and doing what you’ll have to do to truly be successful in this fiercely competitive market.
This article is about how to submit a patent application – specifically a utility patent – and is centered on Step #3 (depending on whether we’re talking provisional or nonprovisional). In the 20-steps, this would fall under “Core IP Protection”, which is the 4th step.
To put ourselves in the correct context regarding how to write a patent application and how to prepare it for filing it with the USPTO, you need some understanding of the preceding steps.
Step 1: Patentability Search and Opinion
I’ve published an all-encompassing article covering the 6-Step Guide to Patent Searching here…
- STEP 1: Understand what a Patent Search is and what it is Not
- STEP 2: Invention Disclosure
- STEP 3: Identify 3-5 Key Features
- STEP 4: Begin Searching Broadly
- STEP 5: Determine Invention Classification(s)
- Step 6: Non-Google Patent Searches
That guide will help you understand what goes into identifying your invention, ownership and co-inventors as well as understanding novelty terms and then finally conducting the world-wide search.
As you read in that article, the only thing that can stop you from getting a patent granted is prior art. That term “prior art” means any published information that is available to a person of ordinary skill in the art (POSITA) would have prior to your patent application filing date.
Step 2: File Provisional Patent Application
As I have mentioned above, I have written several blog articles about how to submit a patent application, and there’s no reason to repeat the information.
Are you wondering what the difference is between a Provisional and a Nonprovisional application for patents? Check out this article which goes through each and breaks it down.
I have written an article on the key 13 steps regarding how to write a patent application – specifically a provisional patent application – from detailed descriptions, enablement, drawings, and filing papers. You can find the article titled “How to File a Provisional Patent Application” here.
The 13 steps are outlined below for reference:
- Step 1: Reality Check: Understand the Risks of DIY
- Step 2: Due Diligence: Perform Patentability Search & Opinion (PSO)
- Step 3: Go or No-Go: Read & Analyze Results of PSO
- Step 4: Aim then Fire: Determine Most Novel Aspects of Invention
- Step 5: The Fluffy Stuff: Title, Background, Boilerplate
- Step 6: The Meat & Potatoes: Writing the Full Enabled Description
- Step 7: Think Out of The Box: All Feasible Alternative Embodiments
- Step 8: Get 3D: Figures Drawings/Pictures/Images
- Step 9: Show and Tell: Detailed Description of Figures
- Step 10: Look Ahead: One Independent Claim for Each Invention
- Step 11: Be Brave: Seek Confidential Reviews & Critiques
- Step 12: The Final Draft: Put it All Together
- Step 13: Put a Bow on it: Gather Required Documents and Prepare for Filing with the USPTO
Each of these steps will be vital to helping you grasp the fundamentals of how to write a patent application. So, get your pencil and a notepad, and open up the provisional patent application article and start taking notes. NOW!
KEY: Remember, you do not have to file a provisional patent application. The main purpose of this type of patent paperwork is to:
- Lock in the priority date
- Allow you up to 12 months to test your invention
- Begin sharing your invention with public
- Test the Market and sell your product (see how it does)
- Get customer feedback on your invention
- Refine your invention and gather/document any improvements or changes
Priority Date…
This just means the actual date when you file the provisional patent application (PPA). This date is critical because any other inventor with the same/similar invention that files their invention after you will LOSE in a priority battle, and YOU will have the rights (or prospective rights therein).
Testing Your Invention…
Yup, testing, 1-2-3! This is the best way to prove the concept you have described so thoroughly in your PPA. Now’s the time to hire developers/prototypers to create your product in a realistic format so you can confirm/validate your invention’s functionality.
Share Your Invention…
For many inventors, this can be the hardest part. You now need to CONVEY the importance and relevance of your invention to your target audience. Or, well, at least a few investors or two. Think SHARK TANK!

NO! Not, that shark tank…ABC’s Television show where real-life investors are considering dropping LOT$ of money on products like yours… You need to be able to pull your head out of your techy-fun inventor world and learn how to submit a patent application that discusses the real market potential and solution you are solving with your invention to a lay-person.
Test the Market…
This is where the rubber meets the road. You need to confirm whether your invention will actually sell. There are often lots of lessons learned here and ways in which your product may take different forms and be packaged/sold with.
Get Customer Feedback…
This is self-explanatory. You will learn more from your initial customer group than you will the rest of your customers for the life of the product. You need to be able to pay special attention to how your customers interact with the product/solution and be as open as you can be about feedback…even rewarding it or gamifying it if possible.
Refining the Invention in the Nonprovisional
This is one of the true beauties of the PPA. You get to roll-up any improvements (found from marketing/selling/customer feedback INTO THE NPA prior to it being reviewed by the USPTO patent examiners.
This benefit cannot be understated. The ability to be more specific and add features which could help the invention gain more value through dependent claims is huge – especially in the context of learning how to write a patent application.
Step 3: File the Nonprovisional Patent Application (NPA)
Ok, so this is the application for patents which is commonly referred to as the “Nonprovisional”, sometimes as shorthand “Utility” application. However, the latter is a misnomer, because a PPA is actually a Utility application.
This article gives the key differences between a provisional and nonprovisional, here.
Ok – and YEEEES, I have written an in-depth article on Utility Patents as well. I have included this article, titled “How to File a Nonprovisional Utility Patent Application” here.
So, you’ve got to take a break here and dive deep, grab a cup of coffee, and read up on the 16 steps of the NPA filing:
Yep… you read that right! We started with Step 14!!! Haha, you’ll love this (if you did your homework on Step 2 that is). The steps 1-13 of the NPA are the 13 steps of drafting a PPA. Makes sense, right?
So, these last core steps are what make up the difference between a PPA and an NPA.
The “Specification”
This is the writing of the patent description. You can’t get away from that. This is where you must describe in as full detail as possible, HOW TO MAKE (one version) of your invention. So it might be a good idea to study a few samples and get the basic gist of how to write a patent description at this point.
This description has to be thorough enough so that someone like you (a POSITA) could pick up the specification (and drawings) and actually make and put to use your invention.
…I mean, the government is going to give you 20 year monopoly for you sharing your invention. If you’re holding back, and not giving sufficient detail, they won’t let it through (See 35 USC 112).
The “Drawings”
Of course! Yes, drawings are technically not required in every application for patents. But, it is STRONGLY suggested. Drawings will allow you to have broader claims, explain how your invention is different from prior art, and, in many cases, will be needed in order to showcase three dimensional aspects/shapes/relationships that words just cannot adequately describe.
I have spent some serious time and created an article dedicated to design patents here. Also, I’ve recorded a podcast where I go into it big time with patent drawing’s expert. Have a listen here.
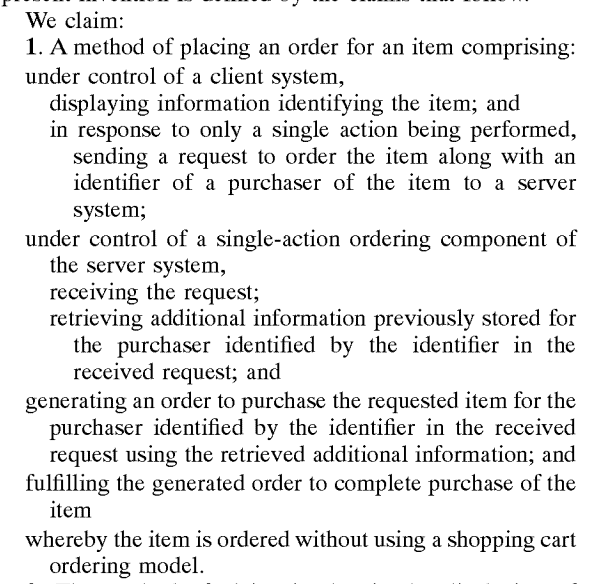
The “Claims”
Ah, the HEART of a patent. This is what you, as the inventor will OWN after all is said and done. Claims must be understood before you begin shaping the way the patent application will be drafted. The entire specification and drawings must be set up in order to support the claimed invention.
For a full deep-dive on patent claim drafting, read up on the article titled, “The Ultimate Guide to Patent Claim Drafting” here.
Step 4: Submitting the Patent Application
Ok, so here’s the not so fun part of the patent process where you will need to fill out forms! Forms, Forms, and more forms. Here is the full set of forms you’ll need when submitting a patent to the USPTO.
Note: I’m showing you the way in which our firm does it, which is using electronic filing system (EFS-Web). This is how most law firms and inventors submit a patent now. In fact, the USPTO will make you pay a higher fee if you submit hard-copies!
Ok, I’m going to give HUGE credit to the USPTO here, and I’m going to be quoting directly from their website in the remainder of the article. For a full PDF of this content, please visit the USPTO.gov, or direct link here.
1) Utility Patent Application Transmittal Form (link to form online here)
This form provides a list of the elements of a patent application and must be completed and signed by the applicant if submitted with the application.
Note: if there is more than one party who makes up the applicant (e.g., there are three inventors and they are proceeding without a patent attorney or patent agent), all of the parties must sign correspondence unless all give power of attorney to one of them to sign all correspondence on behalf of all of them. See discussion of power of attorney below.

2) Fee Transmittal Form (linked online here)
This form is used to identify which fees are being submitted with the patent application.
For a nonprovisional patent application, the basic filing, search, and examination fees are due at filing for all applicants, including small entity and micro entity applicants. If the basic filing, search, and examination fees are not received at the time of filing the application, then a late filing surcharge will need to be paid.
Excess claims fees and application size fee may also be due if certain limits are exceeded. Additionally, if the nonprovisional application is not filed through the USPTO’s Electronic Filing System-Web (EFS-Web) on its Internet website, www.uspto.gov, then a non-electronic filing fee is required.
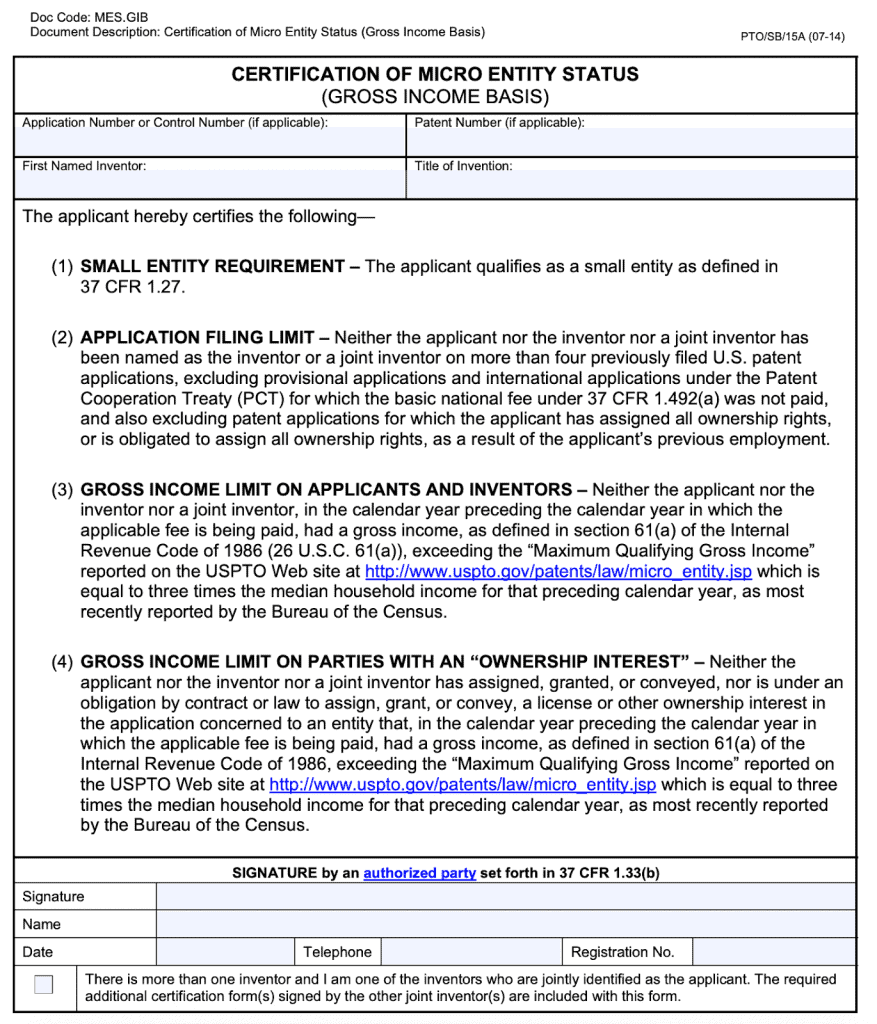
A separate form is required if you are claiming micro entity status. Here is the micro entity form (link to online form)
3) Application Data Sheet (link to online form)
The application data sheet (ADS) is a form that lists bibliographic data including inventor information, applicant information, correspondence address, application, domestic benefit, foreign priority, and assignee information.
This form can also be used to request that the application not be published. The form must be signed by the applicant. This form is mandatory when, for example, the inventors have assigned their rights in the application to a company (assignee) and the assignee is filing the application as the applicant.
The form is also required when the applicant wishes to claim the benefit of a prior-filed provisional or nonprovisional application, or claim priority to a prior-filed foreign or international application.
4) Small and Micro Entity Status Forms (Reduced Fees on income basis here; on educational basis here)
Applicants who have small or micro entity status are entitled to discounts on certain fees. If you qualify as a small entity for patent fee purposes, no special form is required to assert your entitlement to reduced fees (you may check a special box on the fee transmittal form or application data sheet), but you should only submit the exact small entity fee with the application after ensuring that you qualify for the small entity status.
A micro entity is a person, small business concern, or nonprofit organization that meets the requirements of a small entity and a micro entity and completes either form PTO/SB/15A or 15B.
An individual completing PTO/SB/15A to qualify for micro entity status must (1) qualify as a small entity, (2) not have been named as an inventor on more than four previously filed U.S. nonprovisional patent applications, and (3) not, in the calendar year before the year in which the applicable fee is being paid, have had a gross income (see section 61(a) of the Internal Revenue Code of 1986) exceeding three times the median household income.
Also, applicants cannot assign, license, or give rights in the invention to another that would not qualify as a micro entity. See 37 CFR 1.29 and MPEP § 509.03 for more information on who qualifies as a micro entity.
An individual completing PTO/SB/15B to qualify for micro entity status must (1) qualify as a small entity and (2) the applicant’s employer, from which the applicant obtains the majority of the applicant’s income, is an institution of higher education as defined in section 101(a) of the Higher Education Act of 1965 (20 U.S.C. 1001(a)).
Also, the applicant cannot assign, license, or give rights in the invention to another that would not qualify as a micro entity.
5) The Inventor’s Oath or Declaration (Online form here)
Each inventor must make an oath or declaration that:
- The application was made or authorized to be made by him or her
- That he or she believes himself or herself to be the original or an original joint inventor of a claimed invention in the application
- That he or she acknowledges that any willful false statement made in the declaration is punishable under 18 U.S.C. 1001 by fine, imprisonment of under than five years, or both.
If the inventor makes an oath, it must be sworn before a notary public or other officer authorized to administer oaths. Declarations may be used in lieu of an oath. A declaration is not notarized and does not require a witness and is therefore preferable for most applicants.
6) Information Disclosure Statement (Online form for patent documents here, and non-patent documents here)
The information disclosure statement (IDS) is required in order to apprise the USPTO examiner of all information known by the inventor/applicant/attorney prior to filing. This would include the results of any known related/similar patent filings and non-patent publications.
The examiner will be able to use these results to help them refine their own search of the prior art, and will be able to hold the results against the inventor in any novelty issues or nonobviousness issues as they examine the invention’s claims.
Failure to disclose information in an IDS is sanctionable and all parties will be under a similar scrutiny as if they had defrauded the USPTO.
7) File Documents using EFS-Web
The USPTO has done a lot of work ushering inventors through the process here as well. I have provided a very valuable link for finding where live seminars and virtual sessions can be found by following the link here.
First thing you need to do is create an account on EFS-Web. Start with this page as a resource: https://www.uspto.gov/patents-application-process/file-online
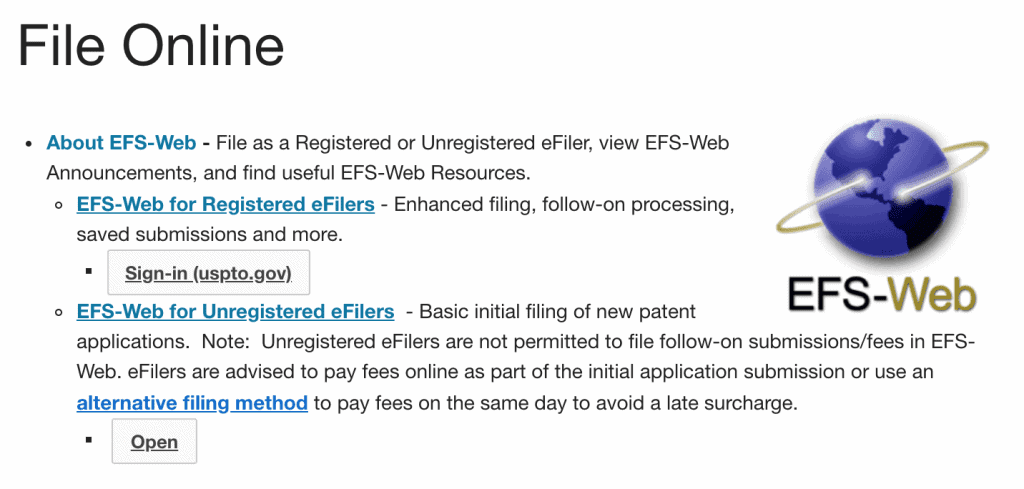
If you do this all the time, as our paralegals and staff do, we click on the “EFS-Web for Registered eFilers”. However, if this is your first time, then you’ll want to click “EFS-Web for Unregistered eFilers”
You should get to a screen that looks like this…
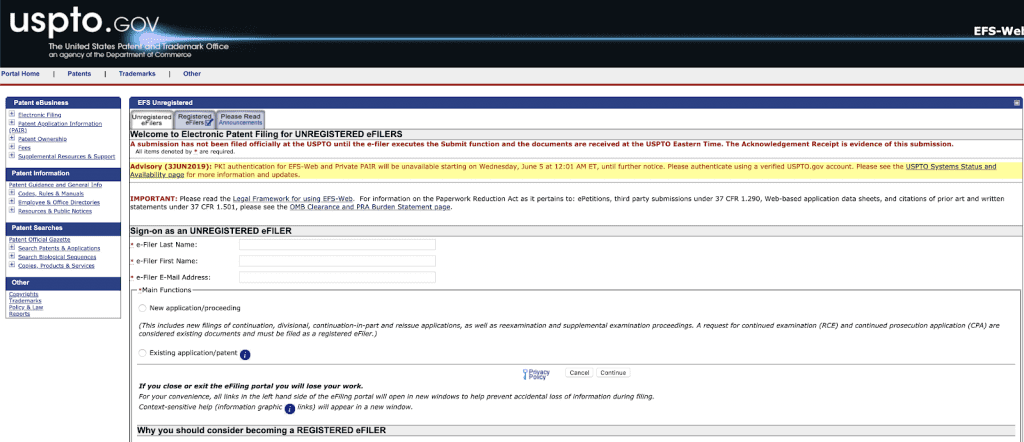
You will want to type in your last name, first name, then email address. Then, below, select the proper radio buttons “Utility Patent”, then “Nonprovisional”…
Here is a zoom-in shot of what it will look like:
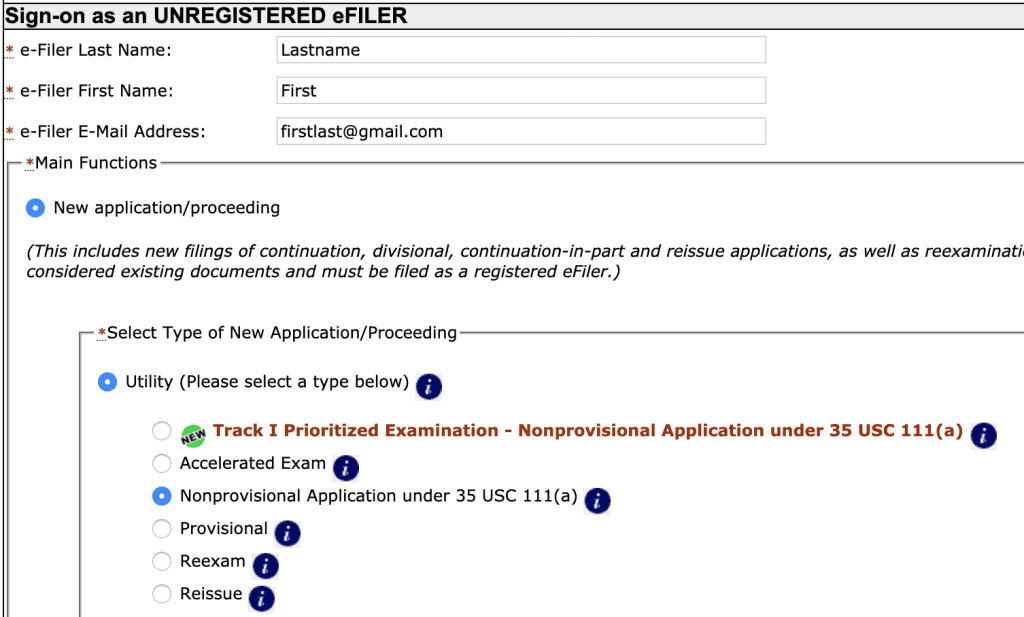
There are a lot of options here that this article will not cover. If you have questions about “Track I”, “Provisional”, “Accelerated Exam”, “Reexam”, or “Reissue”, please contact us at [email protected], we will help you sort through those.
Now, hit “Continue” at the bottom of the page… you should get to the next screen which looks like this:
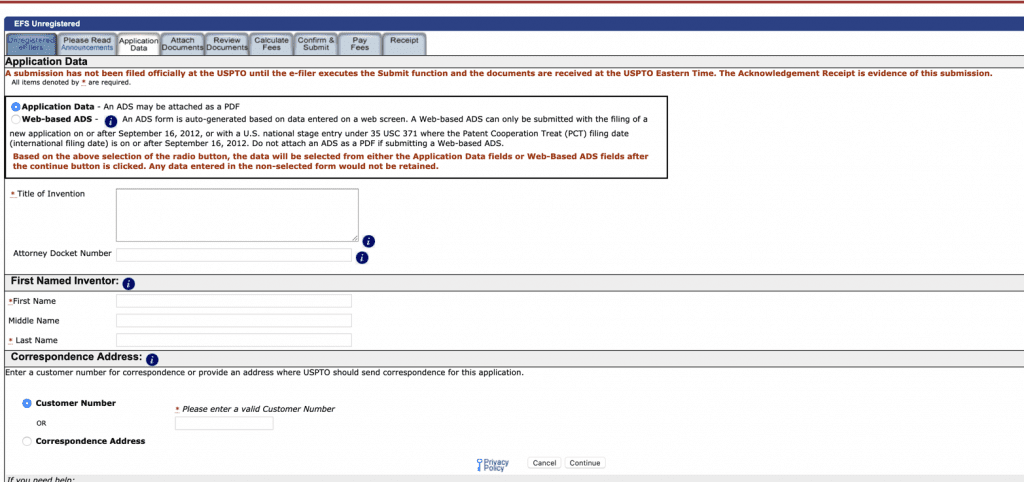
You’ll need to enter the information as prompted. You may also opt for a “Web-based ADS” which may require additional software and Java, something this article will not discuss in detail.
…then hit “Continue”…
On the following page, you’ll see the information you entered on the previous screen, so you can confirm it. Then, listed will be the documents you need to upload:
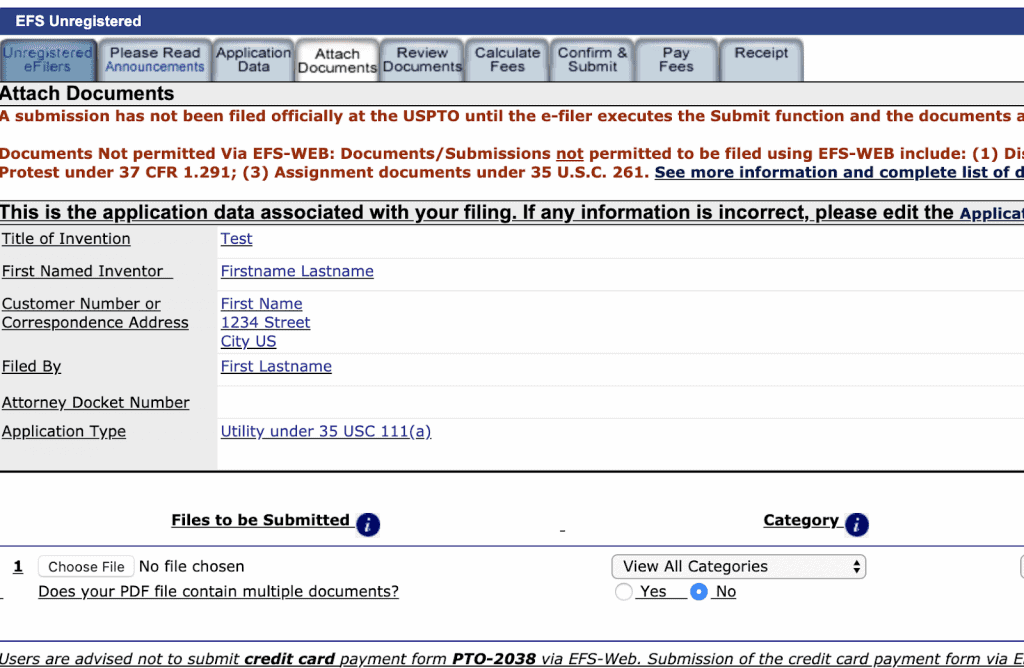
You will hit “Choose File” at the bottom and select the files you’ve prepared. They MUST BE IN PDF in order for the USPTO to properly see them.
Simple select, one at a time the files you’ve prepared (and as described above):
1) Utility Patent Application Transmittal Form
2) Fee Transmittal Form
3) Application Data Sheet
4) Small and Micro Entity Status Forms
5) The Inventor’s Oath or Declaration
6) Information Disclosure Statement
7) Specification
8) Claims
9) Drawings
Then, you will upload all of the PDFs for the 9 items listed above, and continue onto the PAYMENT section.
The payment section of EFS-Web is self-explanatory. The fees owed will depend on what size of entity you are (Regular, Small, or Micro).
You’ve done it!!!
Well. Ok, the PROOF of filing a patent application will come immediately, this is called the “Electronic Acknowledgement Receipt”. It looks like this (this one says “provisional”):
Now, within 1-2 weeks, you should receive an official “Filing Receipt” which is the defacto evidence that the application was received by the USPTO. This is what we encourage our inventors to use in terms of a true filing date and we make sure everything on that receipt looks good.
I found an incredible reference and article written by a law firm named Brown & Michaels that goes over How to Read a Filing Receipt here: http://www.bpmlegal.com/howtofr.html
The form they go over looks like this:
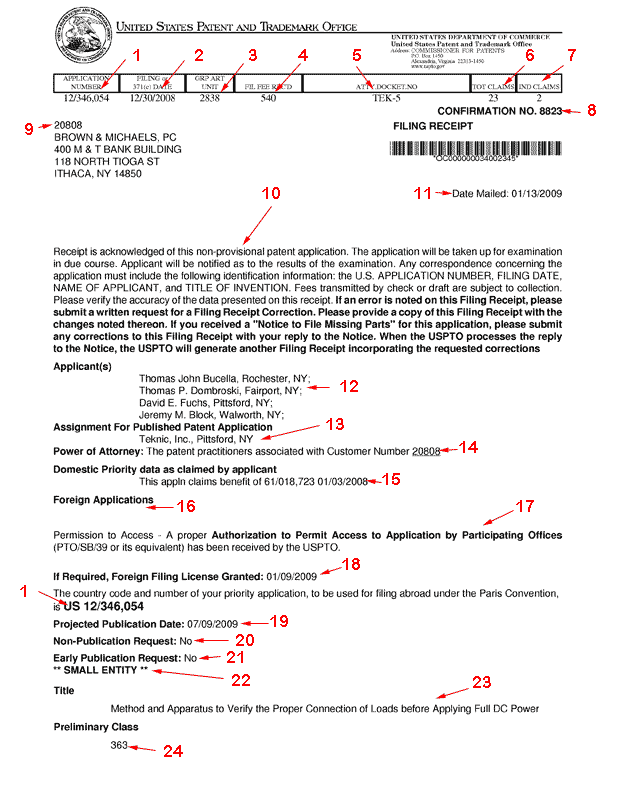
In their article, linked again here, they discuss each of the 24 main areas to consider/review in on the receipt itself to assure correctness.
Tips for Describing an Invention in a Patent Application
Ok… you can now breathe easy… you’ve successful filed and received receipt of your filing with the USPTO.
Just remember that the general steps involve:
- Conducting a patent search
- Filing the PPA and NPA
- Submitting the patent application (which, while tedious, shows that the end is in sight!)
Please don’t be shy about reaching out to anyone on the Bold team should you have any questions about how to write a patent application or the general drafting and filing process. You can always give us a call or hop online and schedule a free advising session if you’d like to have a professional help you figure out how to submit a patent application.
Are you ready to get started on your patent journey?
Legal Note: This blog article does not constitute as legal advice. Although the article was written by a licensed USPTO patent attorney there are many factors and complexities that come into patenting an idea. We recommend you consult a lawyer if you want legal advice for your particular situation. No attorney-client or confidential relationship exists by simply reading and applying the steps stated in this blog article.