
Patent Attorney and Founder
Yikes…16 Steps!?
Yes, but this blog article only has 3 of the 16.
Why?
Well, in order to file a non-provisional utility patent application you need to first file a provisional patent application.
Think of a non-provisional as the final lap around the race.
Before you run your race you need to prep (determine patentability), train (do a patent search), prepare (file your provisional patent) and finally, you can wrap it all up by filing your non-provisional utility patent.
Therefore, it is important to first read my blog article on the 13-Steps on How to File a Provisional Patent Application.
If you have already done that! Perfect, let’s get to learning the last 3 steps to file your non-provisional utility patent application.
This article will focus on the 3 major steps that differentiate a provisional patent application (PPA) from a nonprovisional patent application (NPA):
- Specification: Written Description Sections and Requirements
- Drawings: Flag Notes, Formalities, and Requirements
- Claims: Independent, Dependent, and Styles
I should take a second and explain that we’re talking about utility patent applications here. Utility patent applications are seeking to protect functionality (as opposed to design) elements of an invention.
I’ll also note that for design patent applications (DPAs), there is no such thing as a “provisional design patent application” – only “design patent applications” – so they function much like a nonprovisional patent application.
One last thing before we get started. Below I have provided a couple of resources to further aid you in the non-provisional patent application process:
- Utlity vs. Design Patent (everything you need to know)
- Difference between a provisional & non-provisional patent application
- The ultimate guide to how to file a non-provisional patent application from the USPTO
As another aside (last one, I promise!): one thing I still struggle with (even as a patent attorney) is whether to hyphenate the nonprovisional as “non-provisional”. So… I usually just go by the acronym “NPA” and “PPA” for provisional patent application. Hope you’re cool with that!
Step 14: The Specification
Let’s take a second to think back on steps 1-13… which is everything you will need to prepare a provisional patent application (PPA). The written description covers a lot.
The goal of the PPA, of course, is to lay the foundation of the NPA (non provisional patent application).
The foundation is the written description that sets the boundary of what subject matter may be discussed in the NPA.
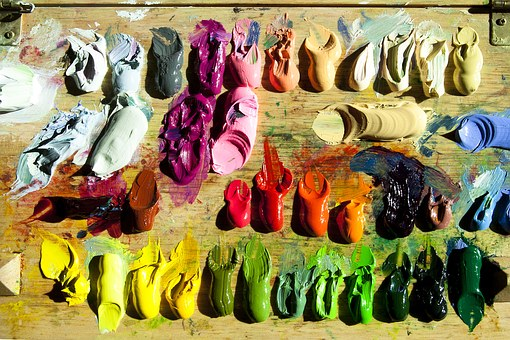
Think of the PPA like a palette of paint, which is all you have to paint the picture – that picture being your NPA and, in essence, the claim set (see Step 16).
You are not allowed to add what is called “new matter” to an NPA if you are making a priority claim to the PPA, which 99.9% of the time, you do.
The specification is the body of the utility patent application, and that is where the invention is described in full. By “in full,” I mean a fully enabled description. An enabled description is one in which an inventor or person of ordinary skill in the field of art would be able to make and use the invention just from seeing the text and viewing the drawings.
The written description requirement for patent law is found in 35 U.S.C. Section 112. I have pulled out the important parts and laid them out for you below.
Note that this law only applies to those applications filed on or after September 16, 2012, as that is when the America Invents Act was passed and changed the law substantially.

There are still three (3) separate requirements within Section 112(a). They are (as interpreted through the courts) as follows:
- A written description of the invention;
- The manner and process of making and using the invention (the enablement requirement); and
- The best mode contemplated by the inventor of carrying out his invention.
A Written Description of the Invention
To satisfy the written description requirement, the specification must describe the claimed invention in sufficient detail that one skilled in the art can reasonably conclude that the inventor had possession of the claimed invention at the time of filing. LizardTech, Inc. v. Earth Res. Mapping, Inc., 424 F.3d 1336, 1344-45, 76 USPQ2d 1724, 1731-32 (Fed. Cir. 2005); Vas-Cath, Inc. v. Mahurkar, 935 F.2d 1555, 1562-64, 19 USPQ2d 1111, 1115-16 (Fed. Cir. 1991).
So it must be in sufficient detail such that one skilled in the art could reasonably conclude that the inventor had possession of the invention.
Many inventors get caught up thinking that they have to have a prototype built or a working model of their invention in order to get a patent. Not true! It just has to be written in such a way that someone could conclude that they had a prototype.
I like to say that the written description must be in such detail so that someone in the field could go make a prototype with just the written description alone.
General descriptions or purely functional descriptions of the invention will not do.
General descriptions of an invention will only, by definition, describe the highlights, or the higher level information, and will gloss over the details. When it comes to patents, the details matter! Federal Circuit courts agree:
Problems satisfying the written description requirement for original claims often occur when claim language is generic or functional, or both. Ariad Pharm., Inc. v. Eli Lilly & Co., 598 F.3d 1336, 1340, 94 USPQ2d 1161, 1167 (Fed. Cir. 2010) (en banc)
“…[T]he specification must demonstrate that the applicant has made a generic invention that achieves the claimed result and do so by showing that the applicant has invented species sufficient to support a claim to the functionally-defined genus.”
Ok, so what’s a “species sufficient to support a claim to the genus”?
This is the one version of the invention that is required under the enablement requirement (see Step #2). Meaning, you are likely claiming one invention over many (perhaps infinite) versions of your invention.
For example: “The first arm is coupled to the second arm….” You could use any of the following structural elements to “couple” the two arms:
- Bolt
- Screw
- Weld
- Pin
- Tongue and Groove
- Magnets
- Oscillating device
- Monkeys
- Channel
- Etc.
(Who caught “monkeys” in that list? Okay! Thanks for reading!)
The point is that the genus of your invention is ALL of those (likely infinite in number) ways of coupling the two arms, as well as the myriad ways that those arms are constructed, attached, and oriented. The species is just one version, the preferred embodiment of your invention.
You’ve got to fully explain at least one version of your invention completely. That’s it!
So, to break the legal definition down a bit, it would help if I explained what a “claim” is.
In a utility patent that gets granted, the claims are what the inventor actually owns! Unfortunately, when the USPTO issues patents, they place the claims down at the very bottom of the patent. You’ve got to know what you’re looking for.
To stay with the monkey theme, here’s a patent titled “Reversible Monkey Wrench”. You can see the cover page below, please note the highlighted areas in red highlight:
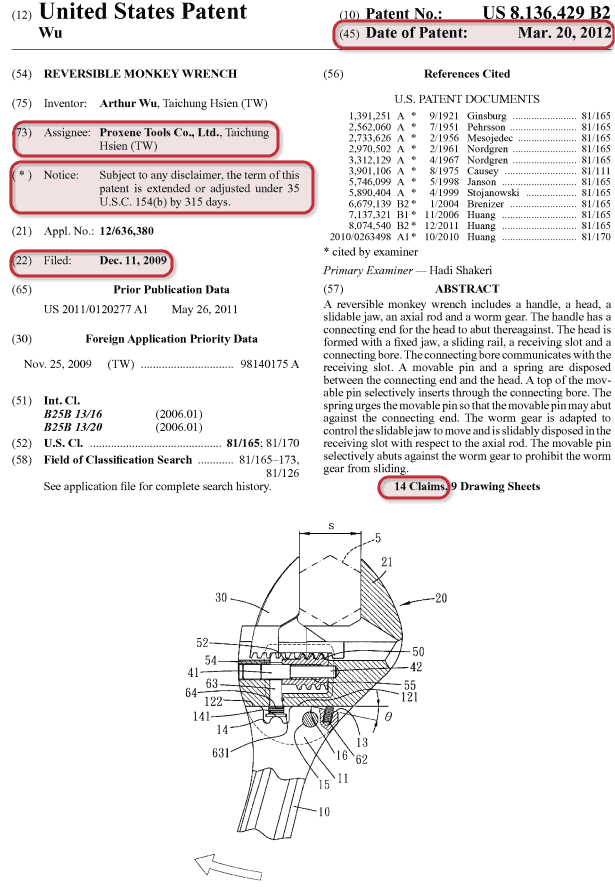
You can see the patent was issued on March 20, 2012 (upper right corner). This is the date the patent rights (the claims) are enforceable. Before this date, the patent owner has no rights to make, use, sell, or import the claimed invention in the US.
Also, note the filed date, which is December 11, 2009. The 20-year monopoly goes back to the 2009 date. Meaning, the patent claims are enforceable until 2029, generally.
However, you can see the “*” special notice that because the USPTO took too long to review and examine or process the patent application, they are going to give an additional 315 days (nearly 1 year!) of additional time – so this invention may have rights out until 2030.
Lastly, take a look at the bottom right. You can see there are “14 claims” identified on this patent. Now you will know to look at each of those, if you’re curious as to whether your wrench infringes this patent.
Here are the claims way at the end of the document….

The yellow highlight shows the independent claim of the invention. It is typical to see more than one independent claim, but in this set all other claims are dependent. You can see in the red circles that claims 2-14 all depend back to Claim 1.
Alright, so we’re working through the three requirements of the written description within Section 112(a), as a reminder, they are (as interpreted through the courts) as follows:
- A written description of the invention [see above];
- The manner and process of making and using the invention (the enablement requirement); and [coming up next]
- The best mode contemplated by the inventor of carrying out his invention.
The enablement requirement is what the word connotes: you have to enable someone in the field of invention to be able to fully appreciate and understand the invention. So much that they could make or use the invention from just the description alone.
A nice quote from Section 2164 of the MPEP is here below:
The purpose of the requirement that the specification describe the invention in such terms that one skilled in the art can make and use the claimed invention is to ensure that the invention is communicated to the interested public in a meaningful way….
…Detailed procedures for making and using the invention may not be necessary if the description of the invention itself is sufficient to permit those skilled in the art to make and use the invention. A patent claim is invalid if it is not supported by an enabling disclosure.
As mentioned above, the main importance of the written description requirement was to make sure that the claims of the utility patent application are properly supported, this section deals with whether the claims are enabled under the above definition.
It is possible, then, to have a claim that is either enabled or supported properly, so a separate inquiry is needed in order to make sure of it.
So… how do you know if you’ve enabled your invention?
Well, there are a few tests that are helpful, as passed down from the courts:
- United States v. Telectronics, Inc., 857 F.2d 778, 785, 8 USPQ2d 1217, 1223 (Fed. Cir. 1988):
- “The test of enablement is whether one reasonably skilled in the art could make or use the invention from the disclosures in the patent coupled with information known in the art without undue experimentation.”
- Callicrate v. Wadsworth Mfg., Inc., 427 F.3d 1361, 77 USPQ2d 1041 (Fed. Cir. 2005)
- “Any part of the specification can support an enabling disclosure, even a background section that discusses, or even disparages, the subject matter disclosed therein.”
- In re Wands, 858 F.2d 731, 737, 8 USPQ2d 1400, 1404 (Fed. Cir. 1988).
- “The standard for determining whether the specification meets the enablement requirement was cast in the Supreme Court decision of Minerals Separation Ltd. v. Hyde, 242 U.S. 261, 270 (1916) which postured the question: is the experimentation needed to practice the invention undue or unreasonable? That standard is still the one to be applied.”
Problems can occur when trying to determine whether the specification explains “how to use” the invention if the baseline apparatus or device is not readily available (like rare Earth elements, or biotechnology cells and tissue).
So, courts have said that if there is a element, device, or apparatus that is difficult to find or requires experimentation, then the specification needs to clearly explain it.
The Best Mode Requirement
This is the requirement that the inventor must explain not just any version of their invention, but they must disclose the best known commercially successful version they know of at the time of filing.
The best mode requirement is summed up well at the beginning of section 2165 of MPEP:
“First, it must be determined whether, at the time the application was filed, the inventor possessed a best mode for practicing the invention. This is a subjective inquiry which focuses on the inventor’s state of mind at the time of filing…
Second, if the inventor did possess a best mode, it must be determined whether the written description disclosed the best mode such that a person skilled in the art could practice it…”
Slap on the wrist POST-AIA….
Unfortunately, the AIA has diminished the enforcement of this requirement because it has removed the ability for patent holders to lose their patent rights for not disclosing the best mode.
In other words, an action seeking to invalidate a patent because the patent owner didn’t disclose the best mode cannot be brought for inventions filed on or after September 12, 2011. Here’s the law:
“Section 15 of the Leahy-Smith America Invents Act (AIA), Public Law 112-29, 125 Stat. 284 (September 16, 2011), did not eliminate the requirement in pre-AIA 35 U.S.C. 112, first paragraph, for a disclosure of the best mode…
…but effective September 16, 2011, it amended 35 U.S.C. 282 (the provision that sets forth defenses in a patent validity or infringement proceeding) to provide that the failure to disclose the best mode shall not be a basis on which any claim of a patent may be canceled or held invalid or otherwise unenforceable.”
Step 15: Drawings
A great guide for new inventors can be found at the USPTO website, and I have taken a quote from their guide here:
“A patent application is required to contain drawings if drawings are necessary to understand the subject matter to be patented. Most patent applications contain drawings. The drawings must show every feature of the invention as specified in the claims.
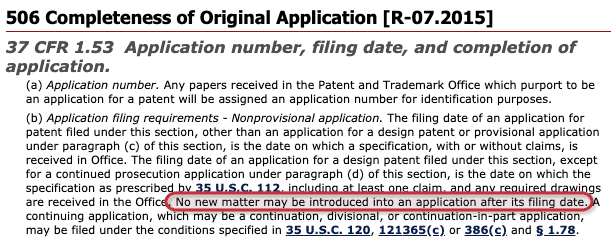
A drawing necessary to understand the invention cannot be introduced into an application after the filing date of the application because of the prohibition against new matter. Please see the detailed Drawing Requirements section.”
There is a whole host of requirements for an NPA filing with regard to patent drawings. The requirements can be boiled down to the following:
- Proper reference in the specification
- Proper marking, identification, and labeling
- Sufficient number of views and total drawings
With respect to the reference of the drawings in the written description (see big section above) you just need to reference which figure and label the reader needs to go to when reading both the drawings and the specification together.
Here’s an example — you can see the figure number, labels, and then below is the figure – everything correlates together nicely.
Staying with the monkey wrench example patent from above, here is a section of the detailed description of the patent:
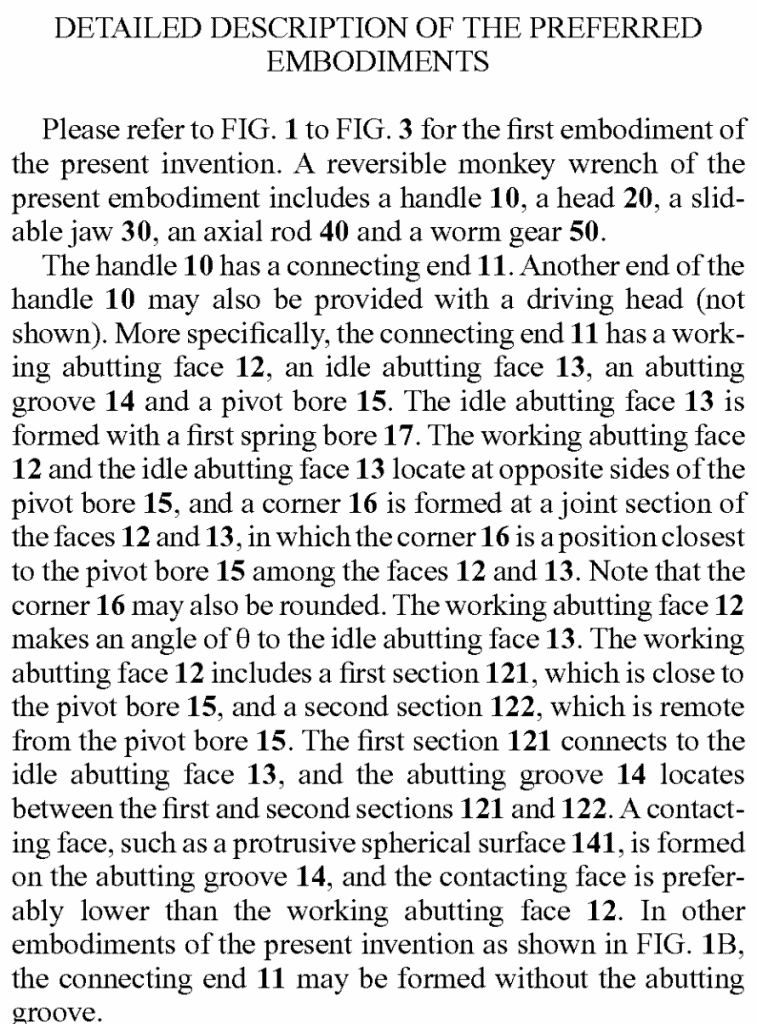
Ok… so you can see they are referring to “FIG.1” and “FIG.3” – those are just short for Figure 1 and Figure 2 respectively.
So, let’s take a look at Figure 1 and 3 (below) and see if you can find “handle” 10, “head” 20, “slidable jaw” 30, “axial rod 40”, and “worm gear 50” (I have highlighted them in blue in case you had trouble):
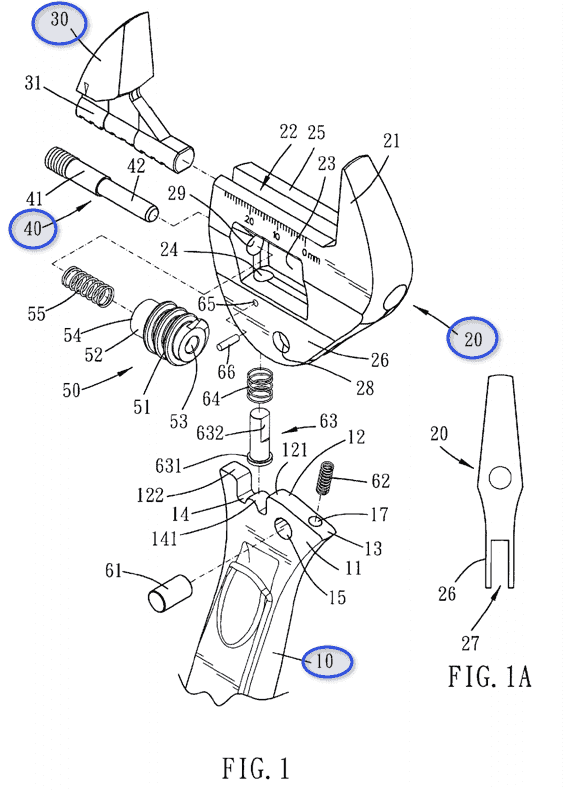
So, you can see that the numbering stays the same between multiple figures. This is so that elements of the invention will remain consistent.
Step 16: The Claims
The claims of a patent are what the inventor owns. This is THE most important part of a utility patent application.
In fact, I have written a blog specifically about how to draft patent claims – please be sure to read that if you want to take things to the next level.
The USPTO examiners will look specifically at the claims in order to determine whether there is any novelty (Section 102) or obviousness (103) prior art before they will allow your patent application through to grant.
I’m going to stick with the same example as we did above, for the reversible monkey wrench. Let’s take apart the yellow highlighted INDEPENDENT CLAIM.

This independent claim is the basis for ALL 13 of the red highlighted dependent claims. Meaning, that it is the most generic/basic version of the invention possible.
If your product you are selling doesn’t have one of these elements, you ARE NOT infringing. Thus, the longer, more detailed independent claims, the NARROWER the patent grant.
In this case, the claim 1 is VERY long, which tells me the actual rights this inventor has are quite narrow. To start, in order to infringe the invention, you have to have a “reversible monkey wrench” with “a handle…a head…a jaw…an axial rod…and a worm gear” – if you don’t have even ONE of those elements, you’re not infringing!
Now, in order to craft this language wisely, you will need to have a very good sense as to what other monkey wrenches have disclosed, so you know precisely what your invention is/does/provides that others don’t.
Since these types of wrenches have been improved upon over the past couple centuries, there is no doubt that this inventor (and their patent attorney) had to be quite specific here.
I’ll say it again, the claim drafting, and the language chosen here is based on the diligence and quality of the patent search that was performed. Generally, the claims should be written as broadly as possible (to get the inventor the most rights possible) without claiming subject matter that is already part of the prior art.
If “prior art” and “patent search” are new terms for you – is OK – please be sure to read my blog article on patent searching here first before trying to draft claims.
Filing the Patent Application
You will want to file the following forms to the USPTO using their Electronic Filing System (EFS-Web):
- Utility Patent Application Transmittal Form or Transmittal Letter
- Appropriate Fees
- Application Data Sheet (see 37 CFR § 1.76)
- Specification
- Claims
- Drawings
- Executed Oath or Declaration
- Nucleotide and Amino Acid Sequence Listing (when necessary)
- Large Tables or Computer Listings (when necessary)
Any forms on this list that you have a question about, please go to the USPTO.gov, as they have the most up-to-date information on forms.
Here is a GREAT website for everything you need and more: https://www.uspto.gov/patents-getting-started/patent-basics/types-patent-applications/nonprovisional-utility-patent
In Summary
We’ve taken a good look at:
- The specification: Written Description Sections and Requirements
- Drawings: Flag Notes, Formalities, and Requirements
- Claims: Independent, Dependent, and Styles
These are the three main parts of an NPA that must be revisited after filing a PPA (upwards of year prior).
An NPA is a major endeavor, even for patent attorneys, so if you are considering taking this step on your own, I would caution you to at least speak with a registered patent attorney prior to doing so — just to make sure you’ve thought through your options.
You can always check out our resources page and get some excellent free resources to guide to or click here to ook a free consultation with us to better understand the process.
We want to know: how much did you know about nonprovisional patent applications prior to reading this blog post? Do you say “nonprovisional’ or “non-provisional?” Let us know in the comments below!Bring your amazing idea to life and work with a patent attorney today! Click here to book your free consultation with us to get started!
—
Legal Note: This blog article does not constitute as legal advice. Although the article was written by a licensed USPTO patent attorney there are many factors and complexities that come into patenting an idea. We recommend you consult a lawyer if you want legal advice for your particular situation. No attorney-client or confidential relationship exists by simply reading and applying the steps stated in this blog article.