
Patent Attorney and Founder
Are you looking to patent a new idea? Are you wondering how to protect the way it looks and prevent copycats? Do you want to know how to get a patent on a design, such as the shape of your product or other visual characteristics of the creation?
Well, a design patent may just be what you’re looking for. A patent provides you the right to prohibit others from using, selling, or importing articles of manufacture with your design. While you do not have sole rights to the design, you can take action against others who infringe on your rights by selling or otherwise using your design.
There is a specific process that should be taken to file a design patent application properly. I’ve laid out the details here in an easy-to-follow 10-step format on how to patent a design.
You have no excuses now! Let’s get started.
Design Patent Law 101
Before we dive into the 10 steps let’s first have a general understanding of design patent law. A design patent protects a three-dimensional shape of an article of manufacture, a design applied to the article, or both.
I’ve laid out below a great summary of the definition of a design by the USPTO:
“A design consists of the visual ornamental characteristics embodied in or applied to, an article of manufacture.
Since a design is manifested in appearance, the subject matter of a design patent application may relate to the configuration or shape of an article, to the surface ornamentation applied to an article, or to the combination of configuration and surface ornamentation.
A design for surface ornamentation is inseparable from the article to which it is applied and cannot exist alone. It must be a definite pattern of surface ornamentation, applied to an article of manufacture.”
Ok, so I’m going to break this down for you a little bit:
- “Article of manufacture” is just fancy for something that can actually be made in the real world.
- “Inseparability” of the design to the object is important so that the design does not become merely artwork/sculpture (domain of copyright law), but instead is the outer appearance of the functional object. So, a design patent protects an innovative, original, and ornamental design, either the shape of an invention or the design applied to the invention, as long as that design is tied to the invention itself. A design patent is unique from a utility patent because it provides protection for the form and appearance of the invention, rather than the function of the invention. An invention could potentially qualify for both a utility and design patent. You can apply for both or choose the aspect of the invention that better suits your business goals and needs for legal protection.
Much more detail about the law of design patents can be found in the Manual for Patent Examination Procedures chapter 1500 and 35 USC 171.
The Patent Prosecution Process
Patent prosecution is the term for the application process with the U.S. Patent and Trademark Office (USPTO). This includes the steps you must take prior to applying, the steps during the application, and the steps as your application is reviewed by the USPTO.
You need to take steps such as ensuring your design meets the definition of a patentable design and determining if your invention infringes on any existing patents. You must also ensure that patenting your invention would not infringe on the rights of any publicly disclosed inventions, patented or not. The process can sometimes be complex, but it can be simpler with the help of an experienced patent attorney.
The process of applying for a design patent includes the following steps:
Step 1 – Invention Disclosure:
Just like the provisional patent application (for utility), a design patent must begin with fully understanding what the invention is.
This begins as organically as you can imagine – as a phone call or initial consultation where the design is discussed and appreciated. Although all the talking in the world won’t be enough until there is a drawing (even if it’s a crude sketch) to begin with.
This first step is when you, the client, elaborate in as much detail as you can about your design.
A good Patent Attorney will then ask you questions about the design to flesh out even more about the surface texture, any elements of the design that are not apparent from the drawings.
The focus is to confirm what’s in the drawing.
Example Questions:
- How does this invention work? Are there any benefits?
- If I were to push the surface here, what would happen?
- I can’t tell what the backside of that closure looks like, can you help me?
- I see you’ve shown that as a cut-view, but I can’t see the thickness – is it solid or hollow there?
- How else could this look?
- Is it important to you that this surface have dimples?
As with any invention, be it a utility or a design application, I find it extremely important to hear about the invention in the inventor’s own words.
When the inventor explains it themselves, you are able to catch subtleties that may have been assumed by the inventor when they drew out the sketch, or intentions that were meant to have been on the drawing, but never made it there.
If you are in a position where you cannot afford to have a professional help you, you should at least get the help of a trusted friend/colleague to perform this with – verbally walk them through your invention and make sure you’re not leaving anything out.
It’s helpful to explain your invention as if you were talking to a 5-year old verbally.
As you do this explanation, you can make sure that every aspect of your invention is readily apparent from several views on the figures. You will have to carefully explain every curve, shape, elevation, and transition.
If you have a prototype – then pictures/photos are worth a thousand words. Use them to help form the basis for drawings or just an understanding of what the entire design is and how it will further affect the surrounding environment, or at least how it will appear.
With utility patent applications, I do not stress the importance of prototypes as much, because there is no requirement that there actually be a real prototype. And, sometimes stopping the process to build a complicated prototype, test it, and get it to work as described can take too long.
However, for design patent applications – without a real prototype, the 3D structure is harder to understand and sometimes, a real-life rendition is required in order to prove that the object can actually be made (which is a requirement).
Are you ready to see your idea come to fruition? Book a free consultation today!
Step 2 – Separate Utility from Design Aspects
Step 1 is first because as part of fleshing out your invention, you will be able to assure you consider and document any potential utility aspects of your invention/design.
Utility aspects just means any functional aspect of the design or invention.
You cannot protect any functionality with a design patent, you can merely protect the way it looks. So, if there is any underlying utility or benefit that may be novel, it should be explored first, then considered for design patenting after.
Don’t miss that: If you have functional aspects of your invention that may be new, protect those FIRST using a utility provisional or nonprovisional patent application.
In terms of value and scope of rights, a utility patent will provide broader protection than will a design patent. A utility patent application has a claim set comprised of the English language, whereas a design patent application is purely the drawings, so there is very little room to argue with a drawing.
Using the full invention disclosure and any answers from questions like “How does this invention work? Are there any benefits?” start to separate the invention into design aspects and utility aspects.
Note that you can (and in many cases should) protect both the functional aspects and the non-functional design aspects of an invention.
Click here to read my article “Utility Vs. Design Patent” for more details about when you should use both patent types.
Do you have additional questions? Book a free consultation, otherwise lets continue our article on how to patent a design.
Step 3 – Conduct Novelty Search
Most design patent applications are submitted without having done a patent search at all.
This is a mistake.
The requirements for getting a design patent are just like that of the utility patent. It must be a novel and nonobvious invention. It cannot be so similar to the prior art otherwise it will be rejected.
A key thing to understand here is that it’s not just previously submitted design patent applications that can prevent you from getting a patent on your design, but ANY publication.
Even if the publication is a utility patent application, or any industry publication (academic, newspaper, marketing, sales, trade journal, science-fiction, etc.) it can act to prevent the design from getting through the patent office.
Before you jump into learning how to write a patent application and filing it, you should do a patent search to make sure that your design is one of a kind. If there are any prior art references or prior patent documents that are similar, chances are the examiner will find it.
Note: Even if the examiner doesn’t find it – when you go to enforce your patent rights, you better bet the defendant will search high and low to find prior art to invalidate your patent later. Thus, the importance of patent searching.
Bold Note: It is definitely harder to do a patent search for designs – and it is why we usually do not have our legal team do a search for design patents, as it is just too cumbersome and the difficulty of not having physical three-dimensional aspects of designs be indexed or searchable makes it nearly impossible to provide a robust opinion.
We do however, encourage inventors to conduct their own searching, as they will likely know where to look.
After you preformed a patent search we recommend you consult with a patent attorney and do a professional search.
Step 4 – The Preamble
“In order to form a more perfect union…”
Ok, not that preamble!
A preamble (in patent terminology) is the formal introduction for the design patent application and it is made up of the title, applicant, and inventor information.
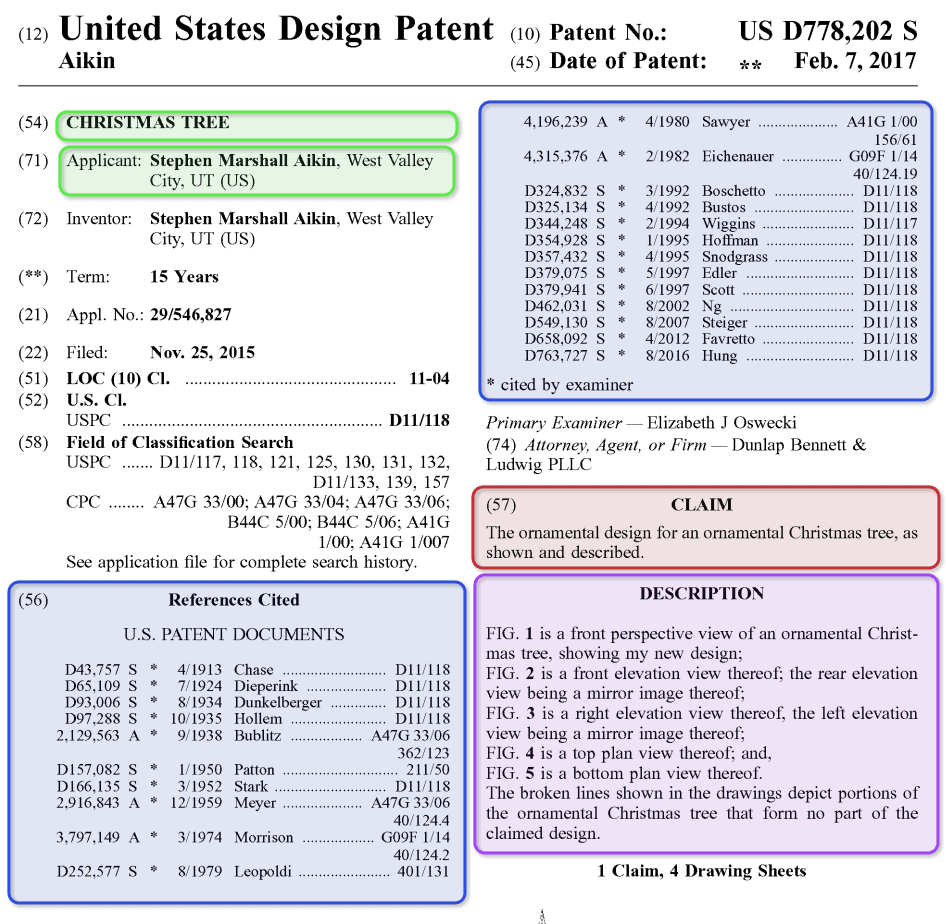
You can see in the below example, US Design Patent D778202 “Christmas Tree”, the Green highlighted sections show the Title and Applicant.
You will see the applicant in this case is the same as the inventor – if the inventor worked for a company, you would see the company instead of the applicant in most cases.
The Title of the design must identify the actual thing in which the design is embodied. The key here is that it must be what the public would perceive as the design, if possible.
Meaning, if the design looks like an apple, then the title should be “Apple.”
Another way to say it is that your Design Patent title needs to be descriptive of the article, and not a way to do marketing or branding.
One of the main reasons for this is to help the examiners and the USPTO properly identify the application and put it in the correct classification.
Proper titles, also help the public at large in understanding the nature and use of the article embodying the design after the patent has been published.
Do you need clarification? Book a free consultation right now!
Step 5 – Cross-References
This is also called “References Cited”, and it is a required part of every patent document to cite to any prior art that the examiner’s relied upon to make their decision to allow the subject matter or design to issue.
Here’s a great video that walks you through how to read cross-references and a cover sheet in general.
This example covers innovation in aerospace:
More references cited usually means the patent is more narrow, as there is a lot of prior art in the same field.
This is not always true, but can be indicative. The same is also true going the other way, that the fewer the citations, generally, the more revolutionary and truly novel the invention and therefore more valuable.
The cross-references are in BLUE in the image below, have a look…

So you can see there are a lot of them. As you will notice, the varying patent numbers are on the left, example “D43,757” was cited as being similar to this Christmas Tree… wow, a patent from 1913!
That’s what is wild about trying to get a patent through the patent office.
The examiner will sometimes cite to OLD inventions to show that this technology has been around for 100 years, which can be quite a blow to a new inventor…
However, in this case, the examiner couldn’t find all elements of the design in the prior art.
But, even if some of the elements of the design are similar, it is important to reference the other patent documents they found so that when someone is doing research in the future – when they find this new Design D778,202, they will also see D43,757.
Think you’re ready? Book a free consultation today!
Step 6 – Descriptions of Figures
This is much a like the specification section of a Utility Patent Application.
It is the only place where written words and descriptions about your invention is allowed and slight elaboration is possible. Thus, it’s important to get right.
The process is fairly straightforward, as the descriptions merely provide the true depiction of what is shown in the figures.
It’s standard practice to abbreviate Figure as “FIG.” and include a numeral beginning with 1. The key is to be consistent. If you’re going to write out “Figure”, then be sure to write out “Figure” on the actual figure drawing.
Another thing that is important to get correct, is the TYPE of view, i.e. perspective view, elevation view, top-plan view, bottom view, side view, etc.
I found a WONDERFUL site for getting more information about patent drawings, and it is where I have borrowed some of the images below. You can find out more there!
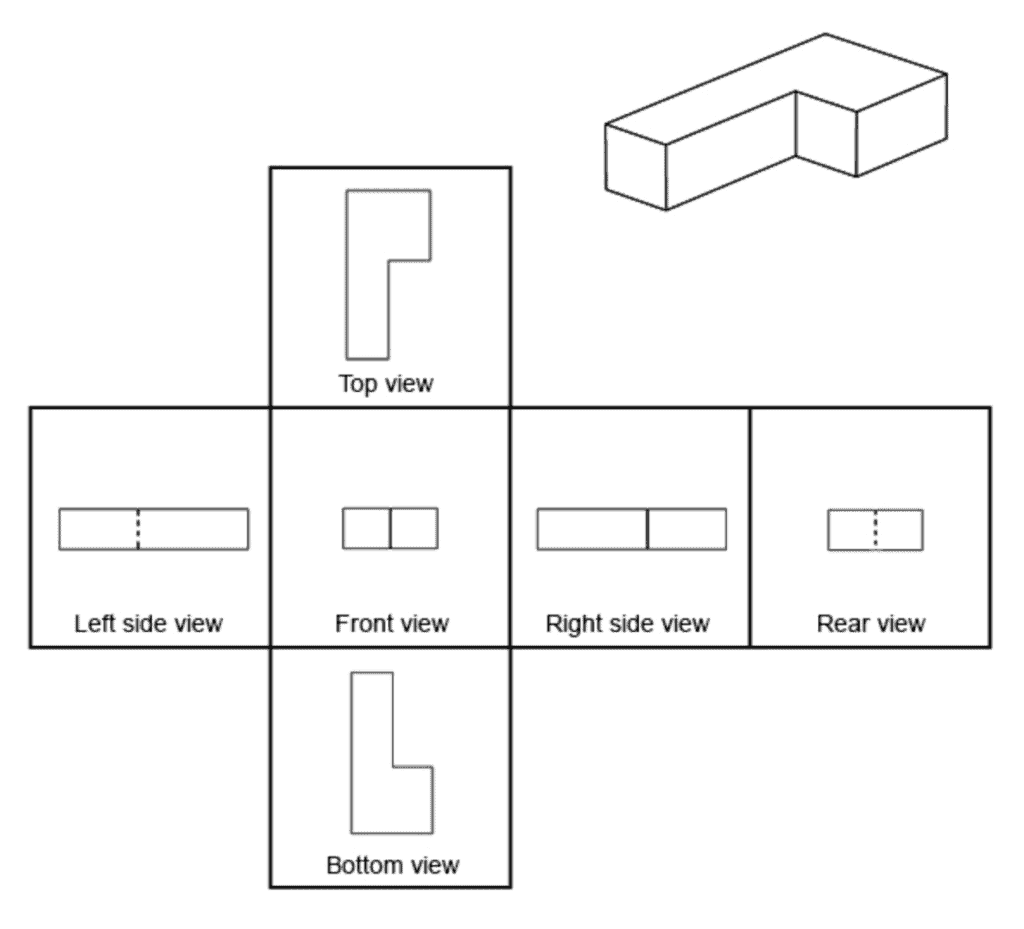
There are many types of views, and here is a non-exhaustive list of all the possible views you might see in a design patent:
- Orthogonal Views which are akin to PURELY 2D engineering drawings may comprise the following sub-view types: Front, Top, Bottom, Left Side, Right Side, Rear. There are only 6 main views for this orthogonal type, think of a dice or a cube, there are only 6 sides.
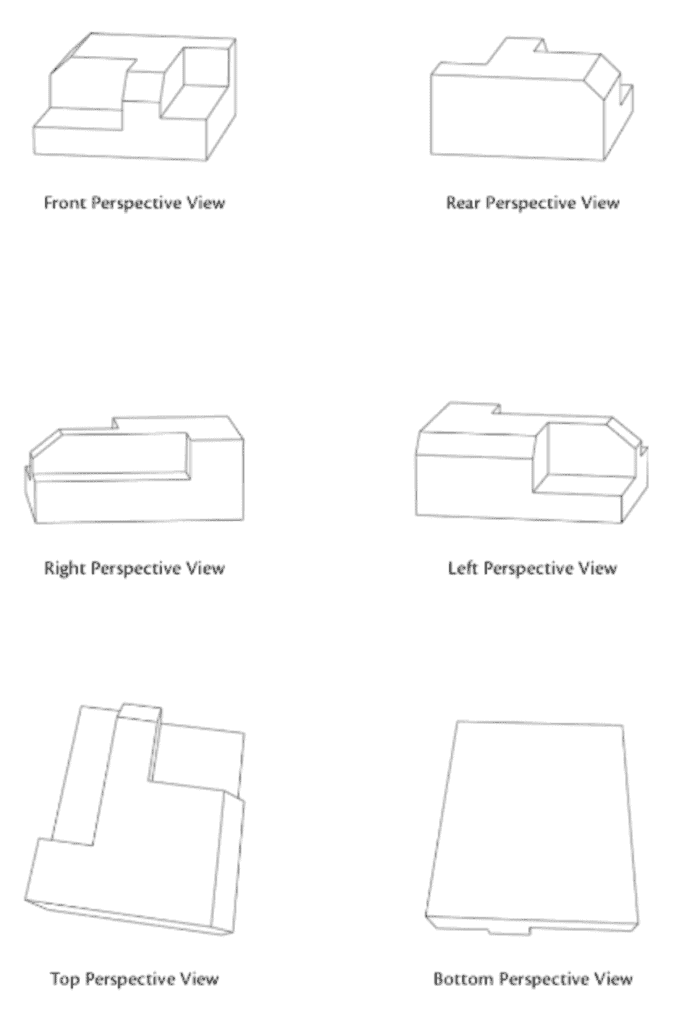
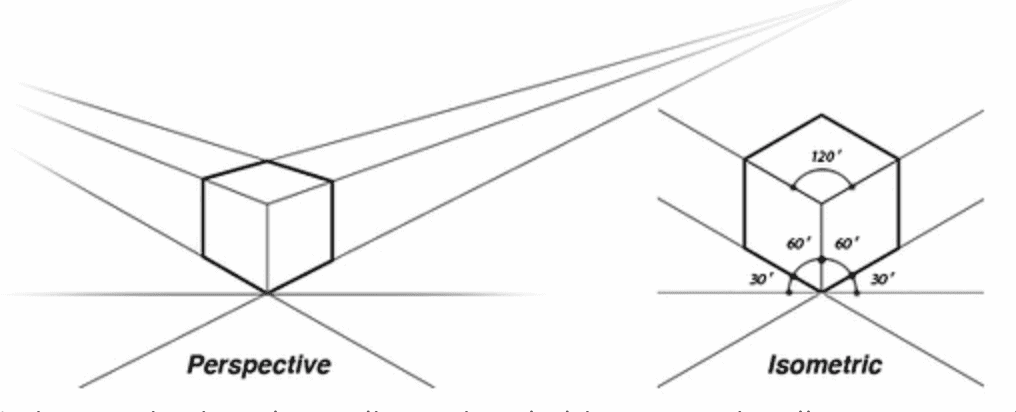
- Perspective Views: this is still a 2D drawing, but is showing a 3D object, with depth and well, perspective 🙂 These drawings have different angles just like orthogonal such as: top, left, right, front, rear, and bottom.
- Isometric Views: This is a 2D drawing, shown in 3D, but using a flattened, unrealistic perspective. It is helpful to show as much detail as possible, without losing view of it, as you would in the real world.
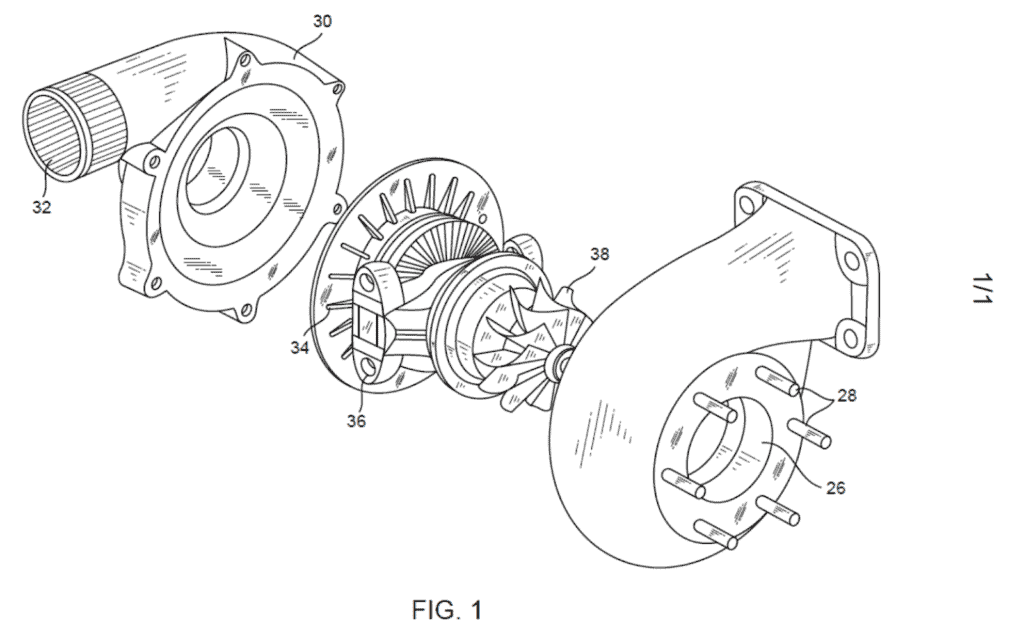
- Exploded Views: These are views in which there are many parts that would be nearly if not completely impossible to see without breaking it apart along a single (or multiple axes) and presenting the different parts as if it were spread out along that axis.
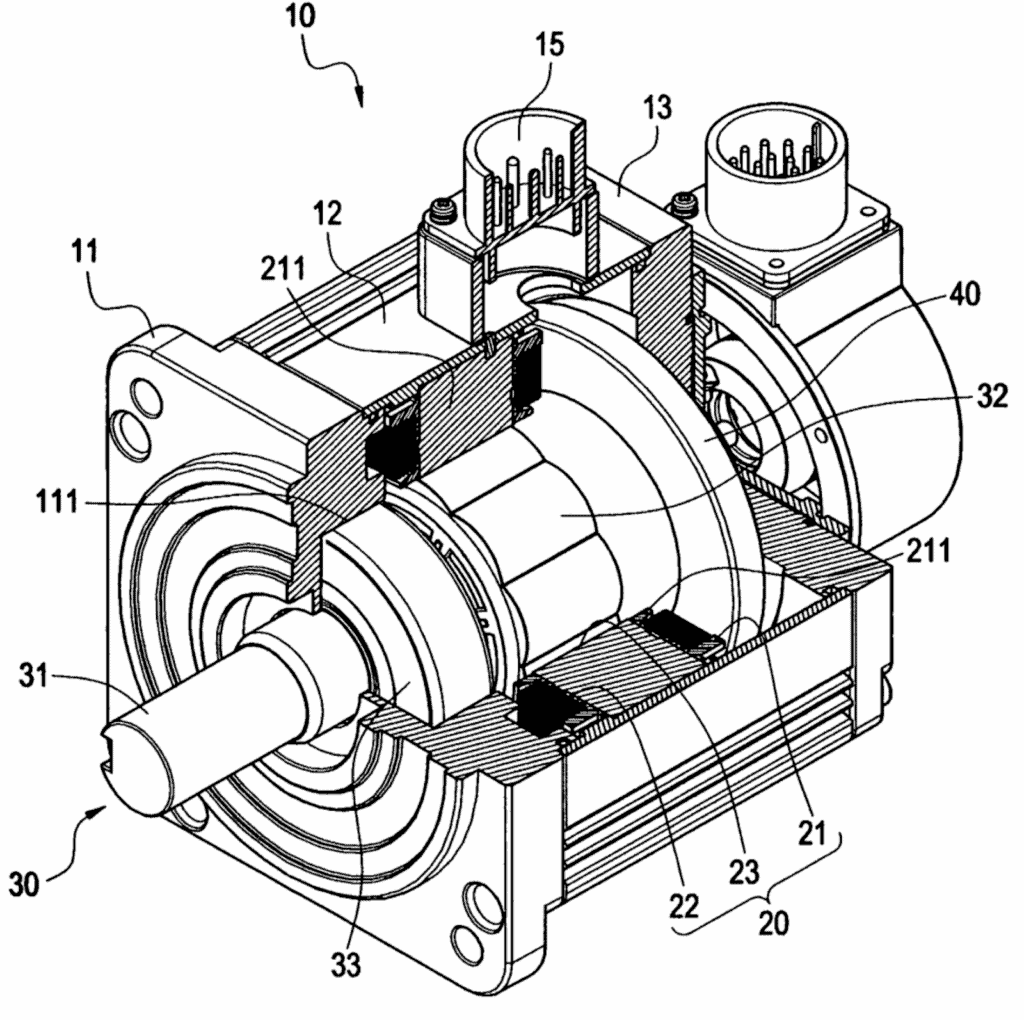
- Sectional Views: These can be either orthogonal or perspective in their viewing, but the essential aspect of these is that some part of the structure has been removed in order to show further detail below some surface
Step 7 – The Claim
In Design patent applications, this is the SIMPLEST part of the whole application. It is almost always the same.
“the ornamental design for a [TITLE OF INVENTION], as shown and described.”
Yup. That’s it. You don’t want to belabor the claim, you want to keep it as simple and unabashed as possible – to allow all control to the drawings themselves. any additional wording here will only LIMIT the rights of the inventor.
Yet another reason to keep the title short and sweet, not limiting in any way, and non-brand/marketing. It will help your claim be as broad as possible, without limiting your rights.
Step 8 – Drawings/Figures or Photographs
This is where the rubber meets the road for design applications. You want to be sure to work with a Patent Attorney and drafting specialist to properly claim your invention and lay you the aspects you want to protect.
At least one black-and-white drawing or photograph is required to be submitted, however, it is very unlikely that just one will suffice.
The requirement under 35 USC 112 is that “the drawings or photographs must include a sufficient number of views to constitute a complete disclosure of the appearance of the design claimed.”
Remember, in a design patent, you are only allowed to claim using the drawings, so it makes the drawings ALL that much more important. To get a few fun examples of what this means, watch this video:
There is a large written body of law under 37 CFR 1.84 that governs precisely how to construct and identify patent drawings – there’s just not enough room here to cover it all, so please pull it up here for a full listing.
37 CFR 1.84 This covers utility application drawings as well, but is more critical that it be followed for design patent drawings because that is all the inventor is relying on to claim their invention.
While it is true that photographs are allowed, what is not allowed is a mixture of photos and drawings, as the different elements of the design will appear different from one type of drawing to the next, and the inconsistency will be unacceptable.
Your drawings/photos may be in COLOR!
Color is allowable, but your Patent Attorney needs to submit a petition to allow color drawings or photographs. The petition needs to outline exactly why color should be allowed. Typically, the only reason is that the inventor wishes to claim a specific color.
What’s interesting though, is that this indication of a color in almost every case LIMITS the rights of the design, because any other color (not claimed) would be non-infringing!
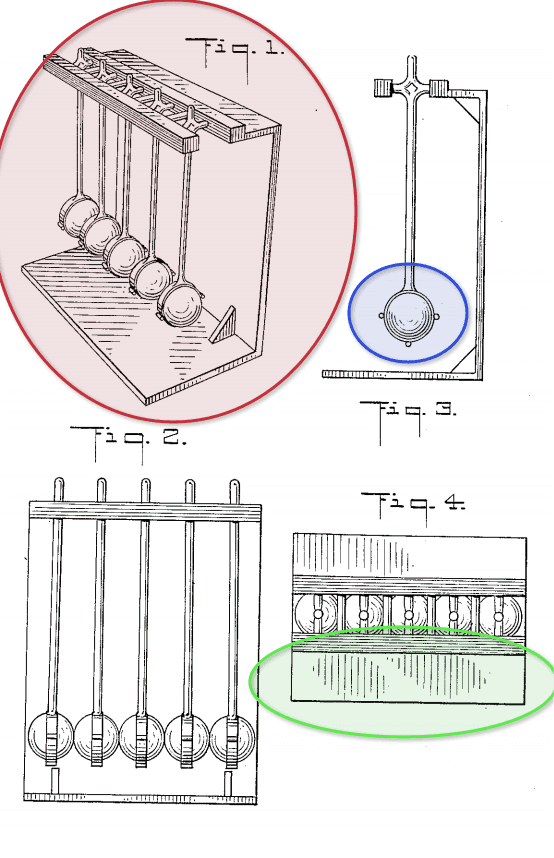
Surface Shading is SUPER important in Design drawings!
This is what really separates design drawings from utility drawings. Shading shows examiners a lot of different things such as:
- Contour of all 3D surfaces
- Differences between two or more adjacent Surfaces
- Showing where there is an opening or a lack of adjacent surface
You can see from the example Design Patent below – that there are circular lines showing the ball is rounded (See blue circle), and there is shading in every view of where there are surfaces – even in odd shapes, they are evenly spaced, so you can see the green area is the same as the top surface that is parallel to it.
The Red area shows that designs can be in perspective view, and still must show each different surface. Everything is fully defined.
A final note about shading is to GET IT RIGHT FROM THE START. If you forget to show the shading and contour of your drawing, and you try to add it later, an examiner may say that your adding that shade added NEW MATTER to your application, and you will not be able to claim back to your original filing date (which could mean you lose rights on your invention if someone else filed after you did). OUCH!
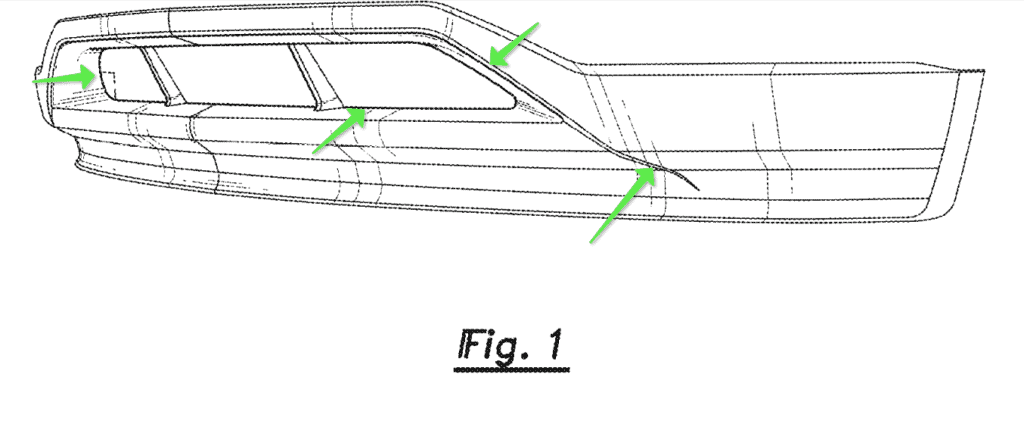
Dashed/Broken Lines – The hidden beauty of Design Drawings
IN design drawings, only the solid black lines are claimed. This means, that any line that is broken or dashed is NOT claimed. It is there for illustrative purposes only.
The dashed lines are permissible to show the environment in which the design or article is placed, or often time shows an example way in which the design will end up looking when for sale (with surrounding structure or related packaging).
The dashed lines should not be as dark or apparent as the solid dark lines. There should be no question as to which lines are dashed and which are solid.
A good example is shown below for the front fascia of a car.
You can see the MAJORITY of the fascia (where the headlights and under grill accessories would go), is DASHED LINE, the only solid line is where I have green arrows shown.
This is to show that 3-opening arrangement with two stanchions is what they are claiming.
Step 9 – Formal Submittal Documents
Much of what we’ve already talked about must be finalized and compiled for later filing (See Step 10).
Here is a listing of what must be submitted:
- Drawings
- Preamble, stating applicant’s name, title of the design, brief description of the drawings and intended use of the article on which the design is embodied
- Cross-references to any related patent application(s)
- Statement regarding any federally-sponsored research and development, or funding
- Full description of drawings
- Figure description
- A single claim
- Executed oath or declaration
The only thing we haven’t talked about yet is the Executed Oath or Declaration.
It’s a form that must be completed and compiled with the other documents identified above.
Are you ready to talk about your invention? Book a free consultation today now that you are better acquainted with how to get a design patent.
Step 10 – EFS Web & File!
Last but not least, is the actual filing of your patent documents. Once you’ve gathered all of your documents you are ready to file.
Navigate to the UPSTO efiling “Portal Applications” page.
From here – click on “eFile (Unregistered)” which is the first option under “Patent Electronic Filing System (EFS-Web).
The USPTO has done a fine job in helping navigate new filers through the system. They made the process easy so that a first-time solo inventor can file it on their own.
How Can Bold Patents Help Me Patent My Design?
As experienced patent attorneys, the team at Bold Patents can help you with each step of the patenting process, from beginning to end.
We can provide advice on your design and invention, including whether it is patentable, whether you are better protected with a utility or design patent, and whether another form of IP protection can better protect your rights. This could include IP protection such as a trademark or a trade secret. Not all designs are patentable, but Bold Patents can help you determine how to effectively protect what you have created and profit from it.
Bold Patents can help you conduct a patent search and an art search, determining if your design already exists or if you are able to patent it.
Our team can help you draft your application, including collecting the necessary documentation. Some designs are complex, and securing the necessary documentation and drawings can be beyond the resources of an independent inventor. Bold Patents has substantial resources from years of navigating patent applications, and we can make this process easier.
Once submitted, we can track your design patent application as it is processed by the USPTO. If the office needs additional information, we can work quickly to provide that documentation and get your application back on track.
At Bold Patents, we understand that each industry is unique and that this can affect each area of the patent application process. We have supported visionaries in many industries and have years of experience that we can leverage to help you. Getting a design patent is much simpler with an attorney by your side.
FAQs
How Much Does It Cost to Patent a Design?
The cost to patent a design of a manufactured item depends on your entity size. There are numerous fees, including an application and examination fee, a fee to conduct a search of other design patents, and a fee if the patent is issued. The basic fees without small or micro entity discounts are:
- Application fee: $220
- Patent search fee: $160
- Examination fee: $640
- Issuance fee: $740
The application fee for a small entity is reduced to $88, and $44 for a micro entity.
Can I File a Design Patent Myself?
It is possible to file for a design patent yourself, but it is very beneficial to do so with an attorney. A patent attorney can navigate the process of determining the patentability of your design and filing a patent application more efficiently. When you file for a design patent yourself, the application may not have all the appropriate information or may not present your invention in the ideal light. This can result in denial of the application or delays in the process.
Can I Sell a Design Without a Patent?
Yes, you can technically sell a design without a patent, whether you are selling your invention as a business owner or selling your invention to another company; however, you do not have as much legal protection. If another party uses, makes, or sells your design, you have no legal recourse. It is important to consider the advantages of getting a patent. Once a year has passed with your invention having been publicly disclosed by you, you can no longer file for a patent.
How Can I Patent My Design for Free?
It is not possible to patent a design for free with a U.S. patent. The USPTO has the Patent Pro Bono Program, but this does not affect the fees associated with filing for a patent. The USPTO does offer discounts for those filing for patents: a 60% discount if you qualify for small entity status and an 80% discount if you qualify for micro entity status. There is no option to waive these fees entirely.
In Conclusion… Work With Skilled Patent Attorneys
So you learned how to get a patent for your idea in the How to Patent My Idea article and now you are wondering how to patent a design and prevent copycats. At Bold Patents, we want to help you protect your innovative design.
Follow these 10 steps to file your design patent application. (Click on any of the links below to revisit that particular section)
- Invention Disclosure
- Separate Utility from Design Aspects
- Conduct Novelty Search
- The Preamble
- Cross-References
- Descriptions of Figures
- The Claim
- Drawings/Figures or Photographs
- Formal Submittal Documents
- EFS Web & File!
Ready to take steps towards filing a patent now that you know how to get a design patent?
You can book a free consultation with us to get professional guidance through the process described above. We can help with each step of the process, limiting your stress and helping you avoid errors that can delay the approval of your patent. Certain errors can even lead to the denial of your patent application. Working with a skilled professional patent team gives you a better chance to successfully secure a patent.
In addition, we will gift you with Bold Patents: The Inventor’s Guide to Patents book for FREE! (Click here to get started today!)
What did you think of the article? What questions do you have about filing your design patent application? Please let me know in the comments below! I am here to help! Get in touch with Bold Patents today and learn how we can help your dreams come to fruition.
—
Legal Note: This blog article does not constitute as legal advice. Although the article was written by a licensed USPTO patent attorney there are many factors and complexities that come into patenting an idea. We recommend you consult a lawyer if you want legal advice for your particular situation. No attorney-client or confidential relationship exists by simply reading and applying the steps stated in this blog article.