
Patent Attorney and Founder
The concept of a “Poor Man’s Patent” has been around a long time. It’s become such a popular term over the years, that I usually field one or two questions about it when I give talks to entrepreneurs and inventors, albeit usually older inventors. And it’s about time I lay it all out for you on my blog, so here goes!
The theory of the traditional “Poor Man’s Patent” is where the inventor compiles the full written description, drawings, and related documents about the invention send it in the mail addressed to themselves, with the intention that a well-known third party (the United States Post Office) will date stamp it and send it back to the inventor. This third-party acknowledgment of the letter provides evidence of the date of the invention, without having to disclose their invention to anyone.
This theory is fraught with issues. Above all, is that since 2013, and the passage of the America Invents Act, no longer are patents awarded to whoever invented first, but instead to whoever files first.
So…the Poor Man’s Patent theory is busted… It doesn’t even matter that you can prove you invented it first, what matters now, is whether you filed it with the USPTO before the other inventor.

Wait! Don’t leave! Open that self-addressed postmarked envelope, and let’s talk about your invention. Let’s talk about how you, even if you are “poor”, can economically navigate through the patent process. I have laid out a guide to actually getting a real poor man’s (or woman’s) patent.
The honest answer to this question is that if you are flat broke you have two options:
- Option 1: Go make it rain, stir up some business, work your tail off and save up some money so you can hire a professional to do it for you (ahem, perhaps Bold Patents?); or
- Option 2: Spend your time (since you don’t have money) on educating yourself (like reading this/related blog articles) here so you can do it on your own
What’s interesting about option 2 is that once you learn what’s all involved, and gain an appreciation for the complexity involved with patent law, you’ll gladly go hustle and raise the money needed to hire a professional Patent Attorney, so your invention will be best protected.
So, here’s the 10 step guide to getting a Poor Man’s (or Woman’s) Patent:
Step 1: Set Your Goal: What do you hope to achieve with patent protection?
It doesn’t take money to set a goal. The simple act of setting your sights on something big, allows you to then make a plan to make it happen. The very best way to go about achieving any goal is to break it down into smaller steps, and then just focus on taking one step at a time, consistently, and over time you’ll surpass your goal faster than you’d imagine.
Many first time inventors (and don’t be shy if this is you) think that “Yeah, all I have to do is get this patented, and I’ll be rich!” The truth is that a patent gives you a negative right to prevent anyone else from making, using, or selling your invention – and it’s up to you to exploit the limited monopoly. Likely no one knows about your invention until you do the hard work of bringing it to market.
Patent protection can be a wonderful boon to many inventors and budding entrepreneurs. One thing to understand is that not all inventors make good business leaders. In other words, I have seen in my experience that inventors have success in business when they join up with or partner with one or more non-technical more business-savvy people.
This way, the inventor can remain the tech-focused innovator (CTO-like) and their partner can play more of the CEO role and focus on funding, networking, operations, and so on.
Partnering can also bring more than just vision and help bringing your product/service to market – it can come with money!
Step 2: Your Invention: Do you have an Eligible invention?
There’s no use going after patent protection for your invention if what you’ve come up with should be protected by another area of Intellectual Property instead, or if your innovation will likely be rejected for failing to meet the subject matter eligibility guidelines at the USPTO.
“Can I patent my logo?” is a question our intake team fields pretty regularly. Trademark law, which governs word marks, design marks (logos) is quite different from patent law. Carefully planning how your company/product brand will start and grow is very important, but trying to get patent (even a Poor Man’s Patent) rights on a trademark will not work.
Speaking of Trademark law, our firm just published a wonderful article on the basics of trademark protection and what you need to know to secure registration. Click this link to read more about it. Sorry, no such thing as a Poor Man’s Trademark either 😉
“I want to Patent my Video I just made!” Unfortunately, creative works like videos, songs, artwork, and the like are a part of Copyright law, not patent law. Assuring you take all measures to identify and protect your creative works is vital for almost every business. However, there are no protections under patent law for these types of art.
Ok, so let’s say you really do have an invention, and you’d like to get protection. It’s true that not all inventions are eligible for patent protection. I wrote an entire article covering patent eligibility that I suggest you read through to determine if your invention will fit within the rules.
Here is a small excerpt covering areas that are traditionally seen as NOT patent-eligible:
- Mathematical concepts
- Methods for organizing human activities
- Mental processes
- Laws of nature, and
- Natural phenomena
Now, there are exceptions, so if you think your invention falls under any of those categories, you should still get the advice of Patent counsel to assure it is ineligible.
Step 3: Market Research: Is there demand for your invention in the market?
This concept is HUGE. Even for those inventors who consider themselves to be a “poor man” or “poor woman” inventor, you MUST have some knowledge of the market and that there are people or companies that will want to pay money for your solution/invention.
In other words, you shouldn’t even spend a penny on patent protection, unless you hink that there is a market for your invention.
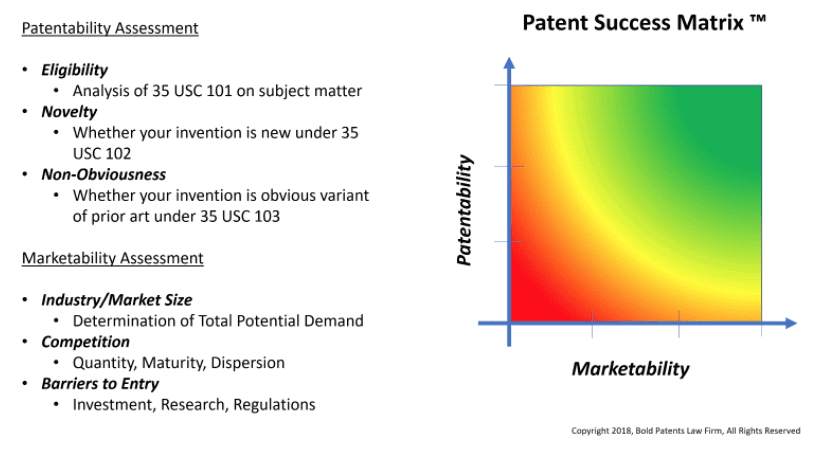
I wrote a succinct article covering this interplay between patentability and marketability which is vital for having true “success” with patents. I call it the “patent success matrix”. Here is the article, and here is the image which I really like to showcase.
Step 4: Patentability Research: Is your invention novel, nonobvious, and have utility?
Once you’ve convinced yourself that your invention has ready, willing, and able buyers – you’re off to a good start! Although, you are not out of the having to work phase!
You’ve determined that your invention is eligible, marketable, now, it’s time to find out if your invention is patentable. This means, has anyone invented and published your invention (or something very close to) before?
As you may have guessed, I wrote an article on patentability as well. Please consider reviewing in depth this article. In that article, I give a 6-step guide to performing a patent search to make sure your invention is unique.
One important facet not to miss is that yes, you, the “poor man” or “poor woman” inventor on your venture to get a “poor man’s patent” can do a patent search on your own, you likely will not uncover as much as a professional patent researcher can. And on top of that, even if you turn over every rock and find everything possible. Will you know what to analyze? Will you know how close is too close?
Having a trained Patent Attorney that knows the subtleties of patent prosecution, has dealth with USPTO examiners in specific art units will be able to give you the LEGAL OPINION you’re really in need of after comparing the prior art, the references to culminate the research phase.
Step 5: Draft Specification: Write an enabled description of your invention
Even a poor man’s patent must have this part. A written description is one of the 3 core requirements to a nonprovisional patent application:
- Written description
- Figures
- Claims
You’ve come pretty far. You’ve got an eligible, market-ready invention that has now been deemed patentable. It’s time to write…
In the title, the one word that defines the goal of how much to write and what to focus on is “enabled”. This means that your invention must be fully enabled through the writings and figures. Practically, someone in your field would be able to take your writings and figures and be able to make or use your invention using just your description alone.
Writer’s block? Not sure where to start?
Take a look at this article, where I lay out how to write a patent application in full. This article will help you think about your invention broadly and cover enough detail to give you the most rights.
See Step 1-5 for prep, and then step 6+ for the detailed specification drafting…
Step 6: Draft/Collect Figures: Relate your invention visually
This is where you get to capture your invention in figures using 2D drawings and images. The main idea of figures is that quite often with inventions that are physical objects, there are features of the invention that just can’t quite be described with words alone.
Therefore, with figures, and reference to the figures, the specification comes alive. This is best done when you are writing the specification (See Step 6) to refer back and forth to the figures and make references to specific flag notes, sections, or labels in the figures to explain relationships, motion, or multiple layers.
As with other steps, I have spent some time writing a specific blog article that covers figures and patent drawings in great detail.
It’s standard practice to abbreviate Figure as “FIG.” and include a numeral beginning with 1. The key is to be consistent. If you’re going to write out “Figure”, then be sure to write out “Figure” on the actual figure drawing.
I found a WONDERFUL site for getting more information about patent drawings, and it is where I have borrowed some of the images below: http://www.patentdrawingexperts.com/blog-post/different-drawing-views/. You can find out more there!
There are many types of views, and here is a non-exhaustive list of all the possible views you might see in a design patent:
- Orthogonal Views which are akin to PURELY 2D engineering drawings may comprise the following sub-view types: Front, Top, Bottom, Left Side, Right Side, Rear. There are only 6 main views for this orthogonal type, think of a dice or a cube, there are only 6 sides.
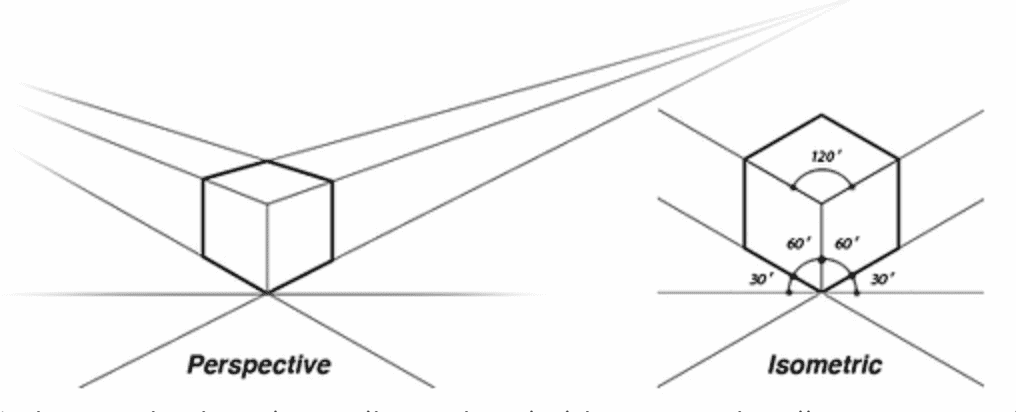
- Perspective Views: this is still a 2D drawing, but is showing a 3D object, with depth and well, perspective 🙂 These drawings have different angles just like orthogonal such as: top, left, right, front, rear, and bottom.
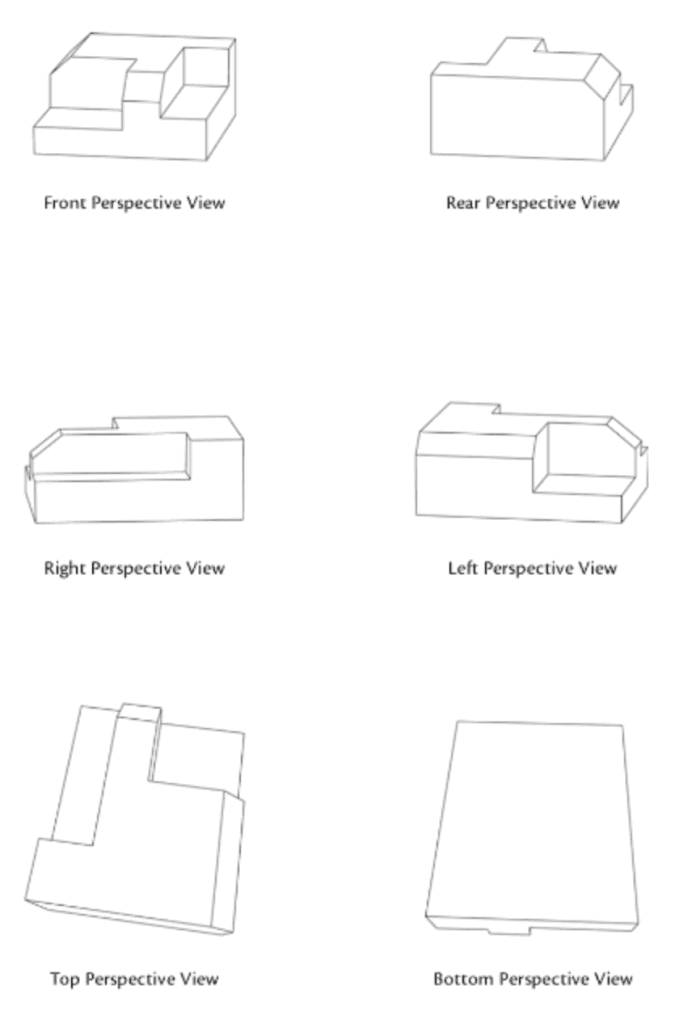
- Isometric Views: This is a 2D drawing, shown in 3D, but using a flattened, unrealistic perspective. It is helpful to show as much detail as possible, without losing view of it, as you would in the real world.
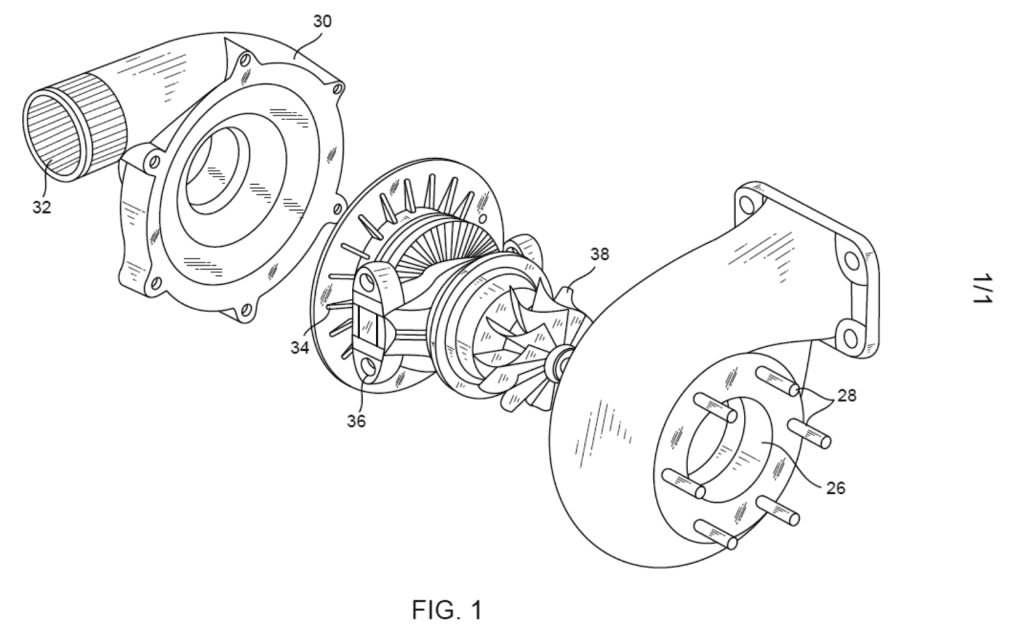
- Exploded Views: These are views in which there are many parts that would be nearly if not completely impossible to see without breaking it apart along a single (or multiple axes) and presenting the different parts as if it were spread out along that axis.
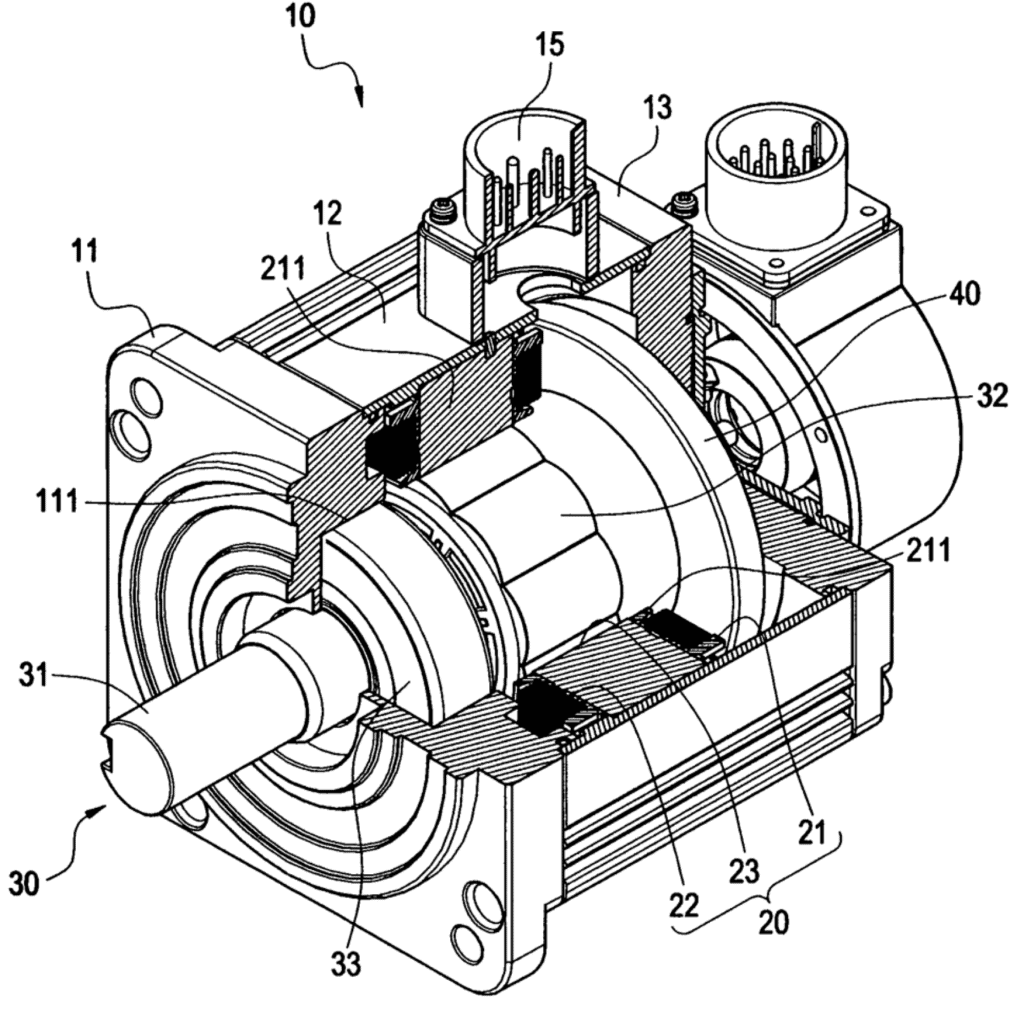
- Sectional Views: These can be either orthogonal or perspective in their viewing, but the essential aspect of these is that some part of the structure has been removed in order to show further detail below some surface
Step 7: Provisional Patent Application: The most economical way to become patent pending
I have written a full in-depth guide on a how to file a provisional patent application.
When you are ready book a free consultation!
Step 8: One Year of Opportunity: Test, Iterate, Validate, and Confirm
This year is the time between filing the provisional and the nonprovisional. After filing a provisional (which is the less formal version of the patent filing) you have exactly one year to file a nonprovisional (the formal utility filing). Read more here for the major differences between provisional v. nonprovisional.
This year is crucial especially for those trying to get by without spending much money at all. And for those trying to get a “poor man’s patent”, this year is where you will raise the money (or find the people that have money) to afford a good Patent Attorney.
During this year before filing the nonprovisional patent application (NPA), you should develop a prototype version of your invention to confirm the proof of concept. Once confirmed, then make more and test it with 3rd parties!
Test and Validate it.
Get your invention in the hands of as many people as you can to make sure they like it, see if it works as intended. Chances are that you will find many areas of your product that need improvement. Be sure to get feedback from anyone who lays hands on your invention – it is gold.
You will want to record as much as possible about how you could make your invention suitable for different customers in the market. Even if these alternative versions are not what you will go to market with right away, they will definitely need to be in your patent application and claim language so you reserve the rights if possible.
While the test data is exciting, it is usually best to keep the test confidential, and to work with a business attorney to draft a simple work for hire agreement whereby you compensate them for providing feedback and testing your invention earnestly, but most importantly, any ideas or inventions they come up with while testing will belong to you (via assignment clause in your agreement).
Many inventors make the mistake of relying on their manufacturer to do this kind of testing for them, and while they are biased, there is the added risk that they become a co-inventor on a substantial improvement of the invention without proper IP assignment agreement made upfront.
Iterate & Confirm
This is the design development of your invention as it nears market-readiness. So, as you get the feedback from the testing (above), make those changes and re-test to confirm the validity/effectiveness of the modifications.
Also, take note that you should work closely with your Patent Attorney to assure that those changes/modifications are discussed and “covered by” your provisional patent application. If not, then you may need to consider filing a subsequent patent application, which would allow you to gain protection.
Step 9: File Nonprovisional Patent Application: Lock in Claims
“Poor man” or not, this is where the rubber meets the road. The nonprovisional patent application (NPA) is the formal utility patent application filing before the USPTO. What is submitted in this application will be examined by a USPTO examiner.
The most distinguishing feature of the NPA is the claim set. Usually, this is a numbered set (from 1-20) where 2 or 3 claims (typically claim 1) are independent and the rest are dependent.
If claims are completely foreign to you, then I encourage you to read my article I wrote on patent claim drafting to gain an appreciation of what goes into writing claims.
In that article, I cover Utility (Apparatus/Systems, Processes, and Compositions of Matter) and Design patents, and the way that we Patent Attorneys select the right words to put into the carefully drafted claim clauses. Here is an excerpt from the article’s table of contents:
…
- Step 1: Set Your Goal: What do you hope to achieve with patent protection?
- Step 2: Your Invention: Do you have an Eligible invention?
- Step 3: Market Research: Is there demand for your invention in the market?
- Step 4: Patentability Research: Is your invention novel, nonobvious, and have utility?
- Step 5: Draft Specification: Write an enabled description of your invention
- Step 6: Draft/Collect Figures: Relate your invention visually
- Step 7: Provisional Patent Application: The most economical way to become patent pending
- Step 8: One Year of Opportunity: Test, Iterate, Validate, and Confirm
- Step 9: File Nonprovisional Patent Application: Lock in Claims
…
There are a LOT more forms and formality required t the NPA phase as compared to the much more informal and causal provisional patent application (PPA). To help with this, I’ve crafted an article on how to file a nonprovisional patent application, including the forms that are needed to submit. Note, the USPTO has a great website (uspto.gov) that is quite helpful on updated forms and rules changes too.
If you clicked on that link and saw there were 16 steps… you might have rolled your eyes…”That’s SO many steps!”… alas, the secret is, that steps 1-15 are already done if you did the PPA earlier!!! Hah! So, all that’s left is formalizing the specification, figures, and drafting claims, as I mentioned before.
Step 10: Prosecute to Grant: Examination, Amendments, and Allowance
One good thing about being “poor” or below the median income level, is that you will likely qualify to be a “micro-entity”, which will discount your USPTO fees by more than 50%.
There are also ways to expedite your invention depending on the subject-matter of your invention. I wrote an article on how long it takes to get a patent which covers potential ways to expedite your patent application through prosecution.
For those with money to invest, there are ways to simply pay $1,000-$2,000 to expedite the invention through prosecution (usually speeding up the process by a year or so). Unfortunately, there are no benefits to those of modest incomes during prosecution with respect to timing – you have to wait in line like everyone else for an examiner to be assigned and an office action to be issued.
There are SO many variables once an NPA is submitted, and some of them are int the inventor’s control. The most important one is how aggressively to argue/fight the examiner. There will be a natural tendency for the examiner to reject a new patent claim – and how vigorously the inventor wants to fight usually makes for a longer/shorter prosecution.
Summary
Here’s a recap of our poor man’s patent guide.
- Step 1: Set Your Goal: What do you hope to achieve with patent protection?
- Step 2: Your Invention: Do you have an Eligible invention?
- Step 3: Market Research: Is there a demand for your invention in the market?
- Step 4: Patentability Research: Is your invention novel, nonobvious, and have utility?
- Step 5: Draft Specification: Write an enabled description of your invention
- Step 6: Draft/Collect Figures: Relate your invention visually
- Step 7: Provisional Patent Application: The most economical way to become patent pending
- Step 8: One Year of Opportunity: Test, Iterate, Validate, and Confirm
- Step 9: File Nonprovisional Patent Application: Lock in Claims
- Step 10: Prosecute to Grant: Examination, Amendments, and Allowance
So, as you found out, there is no such thing as a “poor man’s patent” or a “poor woman’s patent”. You will have to do the hard work one way or another (either by hiring a professional to help you out or by putting the time in to learn how to do it yourself).
And, if you still have any questions that remain unanswered, please schedule some time with our advisor team at Bold Patents so we can help assess whether you’re ready to move forward with your invention and if we’re a good fit for each other.
Book a free consultation today!